Seeing mold on your bathroom ceiling can be a real bummer. It’s not just unsightly; it can also be a sign of bigger moisture issues lurking around. Figuring out how to remove mold from your bathroom ceiling safely is key to keeping your bathroom clean and healthy. This guide will walk you through what you need to know, from finding the cause to cleaning it up and stopping it from coming back. Let’s get your bathroom ceiling looking good again.
Key Takeaways
- Mold on bathroom ceilings typically grows due to high humidity, poor ventilation, or water leaks, creating damp conditions.
- For safe removal, gather protective gear like gloves, goggles, and a mask, along with cleaning tools and a chosen cleaning solution.
- Natural cleaners like white vinegar or hydrogen peroxide are often effective, but commercial cleaners can be used for tougher spots; never mix cleaning chemicals.
- The process involves applying the cleaner, gently scrubbing the mold, rinsing, and thoroughly drying the area to prevent regrowth.
- Preventing future mold involves improving ventilation, fixing leaks, keeping the bathroom dry, and using mold-resistant paint.
Understanding Bathroom Ceiling Mold
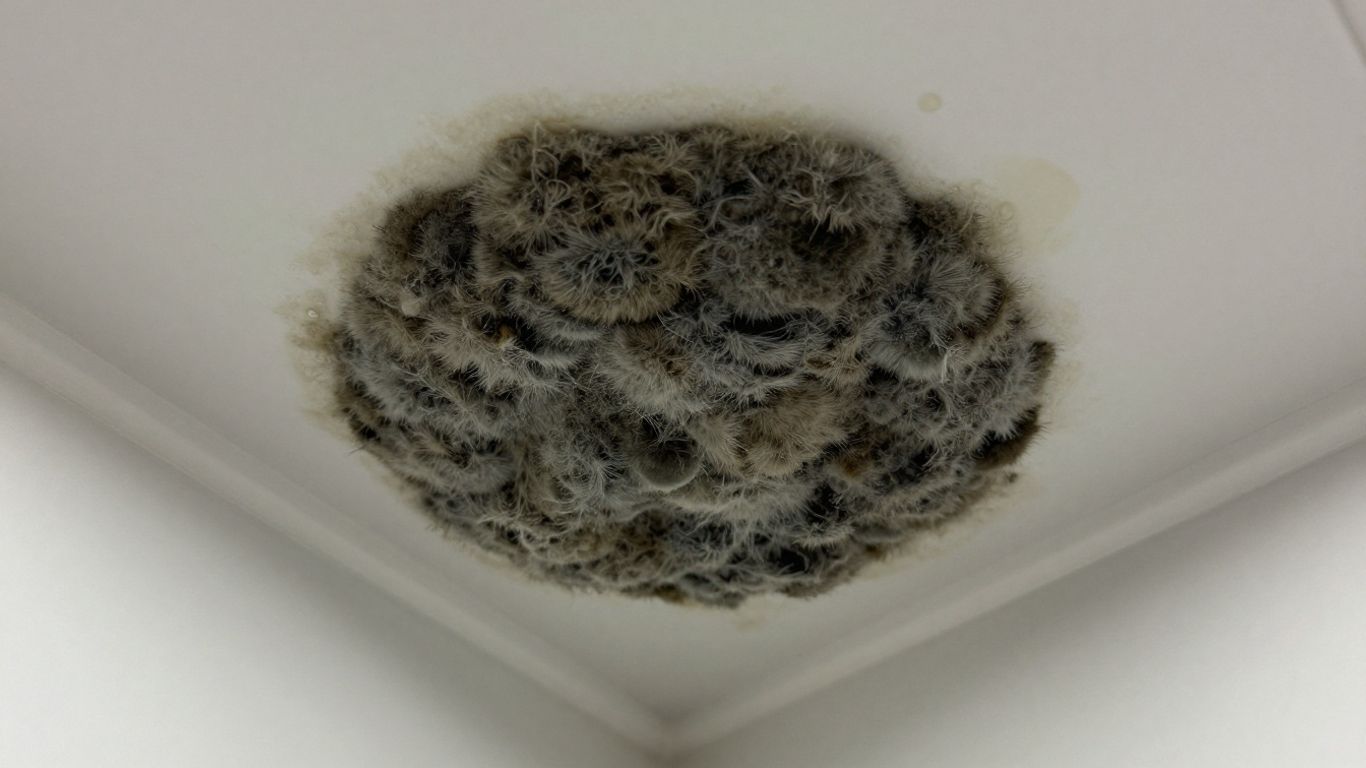
Seeing those little black or greenish spots pop up on your bathroom ceiling can be a real bummer. It’s a pretty common issue, honestly. Bathrooms are basically humid little ecosystems, and mold just loves that. The main reason mold decides to set up shop on your ceiling is usually too much moisture hanging around without a good way to escape. Think steamy showers, condensation from hot water, or even just general high humidity in the room. If your bathroom doesn’t have good airflow, that moisture just sits there, creating the perfect party spot for mold spores.
Common Causes of Ceiling Mold
Several things can lead to mold making a home on your bathroom ceiling:
- Excess Moisture: This is the big one. Showers, baths, and even running the sink can pump a lot of water vapor into the air. If it can’t get out, it condenses.
- Poor Ventilation: Not running your exhaust fan, or not having one at all, means that moist air just circulates. It’s like leaving the lid on a pot of boiling water – the steam has nowhere to go.
- Condensation: When warm, moist air hits a cooler surface, like your ceiling, it turns into water droplets. This is especially common in bathrooms that aren’t well-heated or insulated.
- Leaks: Sometimes, it’s not just humidity. A slow leak from a pipe above, a faulty window seal, or even a roof issue can introduce water directly to your ceiling.
- Drying Clothes Indoors: If you ever dry laundry in the bathroom, that adds a significant amount of moisture to the air, giving mold a real boost.
Why Mold Grows in Bathrooms
Bathrooms are practically designed for mold. They’re warm, often damp, and usually have surfaces like paint or drywall that mold can feed on. Mold spores are everywhere, floating around in the air. They just need the right conditions to start growing. The combination of warmth, moisture, and organic material (like dust or the paper backing on drywall) makes your bathroom ceiling a prime target. It’s a cycle: moisture builds up, spores land, and if they have enough to eat and drink, they start to multiply. This is why bathroom ceiling mold develops due to high humidity, steam from showers, condensation, and inadequate ventilation.
Identifying the Source of Moisture
Before you can really tackle the mold, you need to figure out why it’s there. Is it just from showering? Or is there a bigger problem? Take a look around. Does the fan seem to work well? Are there any water stains that look like they’re coming from above? Sometimes, it’s as simple as needing to run the fan longer after a shower. Other times, you might need to check for leaks in plumbing or around windows. Pinpointing the exact source of the dampness is key to preventing the mold from coming back.
Mold isn’t just an eyesore; it can affect the air quality in your home. Addressing the moisture problem is just as important as cleaning the mold itself. If you’re not sure where the water is coming from, it might be worth getting a professional opinion before you start cleaning.
Gathering Your Mold Removal Supplies
Alright, before we get down to business with the actual mold removal, we need to make sure we have everything ready. It’s not super complicated, but having the right stuff on hand makes the whole process go a lot smoother and, more importantly, safer. Think of it like prepping for a big cooking project – you wouldn’t start chopping without your knives, right? Same idea here.
Essential Safety Gear
This is non-negotiable. Mold spores can be nasty, and you don’t want to be breathing them in or getting them on your skin. Your health comes first, always.
- Gloves: Get some sturdy rubber gloves. Disposable ones are fine, but thicker kitchen gloves work well too. You want something that goes up your arm a bit if possible.
- Eye Protection: Safety goggles are a must. They’ll stop any cleaning solution or moldy bits from splashing into your eyes.
- Mask: A good quality mask, like an N95 respirator, is best. A simple dust mask might not be enough to filter out the tiny mold spores.
- Old Clothes: Wear something you don’t mind getting stained or throwing away afterward. Mold and cleaning chemicals can be tough on fabric.
Cleaning Tools and Materials
Here’s what you’ll need to actually do the cleaning:
- Spray Bottles: You’ll need a couple for your cleaning solutions. Make sure they’re clean before you start.
- Sponges and Cloths: Have plenty of clean sponges and soft cloths ready. You’ll use these for applying the cleaner and wiping surfaces. Avoid anything too abrasive that could damage your ceiling paint.
- Scrub Brush (Soft Bristled): For tougher spots, a soft-bristled brush can help, but be gentle.
- Bucket: For rinsing your cloths and sponges.
- Plastic Sheeting or Old Towels: To protect your floor and any bathroom fixtures below the ceiling. This catches drips and debris.
- Fan or Open Window: Good ventilation is key. You’ll want to keep the air moving to help dry the area and clear out any airborne spores. An air purifier can also be helpful if you have one.
Protective Measures for Your Bathroom
Beyond your personal gear, you need to protect the space itself. This helps contain the mess and prevents mold from spreading.
Lay down plastic sheeting or old towels on the floor directly beneath the affected area. Cover any sinks, tubs, or vanities that might get dripped on. Closing the bathroom door and sealing off any vents can also help prevent spores from traveling to other parts of your home during the cleaning process.
Remember, ventilation is super important. If you can, open a window and set up a fan to blow air out of the bathroom. This helps remove moisture and spores from the room. If you’re dealing with a particularly stubborn mold issue, you might even consider professional mold removal services if it seems overwhelming.
Choosing the Right Cleaning Solution
So, you’ve spotted that unwelcome fuzzy growth on your bathroom ceiling. Before you grab the first spray bottle you see, let’s talk about what you’re going to use to tackle it. Picking the right cleaner is key to getting rid of the mold effectively without damaging your ceiling or, more importantly, yourself.
Effective Natural Mold Removers
Sometimes, the simplest solutions are the best. For mild mold issues, you might not need harsh chemicals at all. Many common household items can do a surprisingly good job.
- White Vinegar: This is a go-to for many. Mix equal parts distilled white vinegar and water in a spray bottle. Vinegar is acidic enough to kill mold spores but generally safer than bleach. Just be prepared for a temporary strong smell.
- Baking Soda: A paste made from baking soda and water can be applied to the moldy area. It helps absorb moisture and can be scrubbed away. You can also mix it with water in a spray bottle.
- Hydrogen Peroxide (3% solution): This is another good option that kills mold and can help with stains. Always test it on an inconspicuous spot first, though, as it can sometimes lighten surfaces.
- Tea Tree Oil: If you’re into essential oils, tea tree oil has natural antifungal properties. Mix about a teaspoon with a cup of water in a spray bottle. Let it sit on the mold for a while before wiping.
When dealing with mold on a ceiling, it’s especially important to consider what might drip or splash back on you. Natural cleaners like vinegar are often a safer bet than commercial products that contain bleach.
When to Consider Commercial Cleaners
While natural options are great, sometimes the mold is a bit more stubborn, or the area is larger. In these cases, a commercial mold remover might be necessary. Look for products specifically designed for bathrooms and mold removal.
Here’s a quick rundown of what to keep in mind:
- Effectiveness: Some commercial cleaners are formulated to tackle tougher mold and mildew stains more aggressively.
- Safety: Always read the label carefully. Many contain bleach or other strong chemicals that require good ventilation and protective gear. You might want to check out options like Clorox Tilex Mold and Mildew Remover if you’re looking for something specifically for bathrooms.
- Application: Some come as sprays, others as gels or wipes. Consider what will be easiest to apply to a ceiling.
Safe Cleaning Solution Combinations
Sometimes, you might want to combine methods or products for maximum impact. However, it’s crucial to know what not to mix.
- Never mix bleach with ammonia or vinegar. This creates toxic fumes that are extremely dangerous.
- A common approach is to use a commercial cleaner or a strong natural solution like vinegar, let it sit, and then gently scrub. If stains persist after the mold is gone, you might then consider a hydrogen peroxide solution or a specialized stain remover.
Remember, the goal is to kill the mold and remove it without causing harm to yourself or the ceiling. Always prioritize safety and ventilation, no matter what you choose to use.
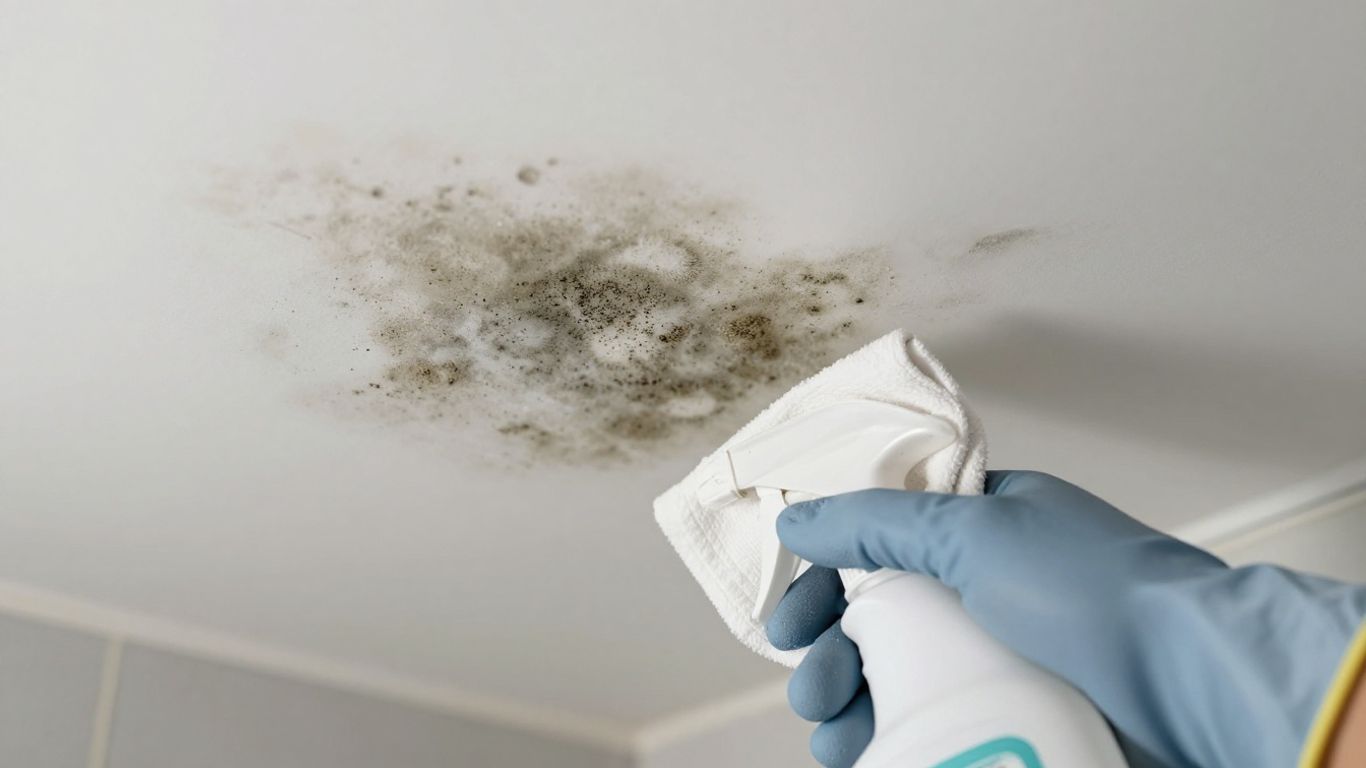
Step-by-Step Mold Removal Process
Alright, so you’ve figured out where the mold is coming from and you’ve got all your supplies ready. Now comes the actual cleaning part. It’s not super complicated, but you do need to be methodical about it. The key is to kill the mold and then get the area completely dry.
Applying the Cleaning Agent
First things first, put on your safety gear if you haven’t already. Open up a window or turn on the exhaust fan to get some air moving. Grab your chosen cleaning solution – whether it’s a vinegar and water mix, a hydrogen peroxide solution, or a commercial cleaner. Spray it directly onto the moldy spots on your ceiling. If you’re using a spray bottle, aim it so it covers the affected area well, but try not to let it drip everywhere. Let the solution sit for about 10 to 15 minutes. This gives it time to work its magic, breaking down the mold and killing off those pesky spores.
Gently Scrubbing Away Mold
After letting the cleaner do its thing, it’s time to gently scrub. Use a soft-bristled brush or a sponge for this. You don’t want to scrub too hard, especially on a painted ceiling, because you could damage the surface. Just work the cleaner into the moldy areas. If you notice some light staining remains after this, don’t worry too much. We’ll tackle that in the next section. The main goal here is to lift the bulk of the mold off the surface.
Rinsing and Thorough Drying
Once you’ve scrubbed, take a clean, damp cloth and gently wipe down the area. This removes any leftover cleaner and mold residue. Make sure you’re using a clean part of the cloth or rinsing it frequently. After wiping, the most important part is drying. You can use a clean, dry towel to pat the area dry, or better yet, set up a fan to blow air directly onto the ceiling. Mold loves moisture, so you need to make sure that ceiling is bone dry before you do anything else. This might take a few hours, so be patient.
Remember, mold thrives in damp conditions. The more thoroughly you dry the area after cleaning, the less likely it is to return quickly. Don’t rush this drying step; it’s as vital as the cleaning itself.
Here’s a quick rundown of what you’ll need for the cleaning part:
- Cleaning Solution: Your chosen mold killer (vinegar, peroxide, or commercial product).
- Scrubbing Tool: A soft brush or sponge.
- Wiping Cloths: Clean, damp cloths for rinsing.
- Drying Tools: Dry towels and/or a fan.
If you’re dealing with a larger mold issue, you might want to look into professional mold removal services [8c74]. They have specialized equipment to handle bigger jobs safely.
Addressing Lingering Stains and Prevention
Painting Over Stubborn Stains
So, you’ve scrubbed away the mold, but there are still those stubborn, shadowy marks left behind. Don’t worry, this is pretty common. Often, the mold has been there long enough to discolor the paint. The good news is, you can usually cover these up. Before you grab any old paint, though, it’s smart to use a mold-resistant primer first. This acts like a barrier, helping to seal in any remaining microscopic spores and preventing the stain from bleeding through your top coat. After the primer dries completely, you can apply your ceiling paint. Choosing a paint specifically designed for bathrooms or high-humidity areas will give you an extra layer of defense against future mold.
Implementing Preventative Measures
Getting rid of mold is one thing, but keeping it from staging a comeback is the real win. It all comes down to managing moisture. The simplest, most effective step is to use your bathroom’s exhaust fan every single time you shower or bathe. Let it run for at least 20 minutes after you’re done to clear out all that steamy air. If you don’t have an exhaust fan, or if it’s not cutting it, try opening a window during and after your shower. Leaving the bathroom door ajar also helps a lot with air circulation.
Here are some other things that really help:
- Wipe down wet surfaces: After showering, quickly wipe down the shower walls, and if you notice any condensation on the ceiling, give that a quick wipe too.
- Consider a dehumidifier: Especially if your bathroom is small or doesn’t have good ventilation, a dehumidifier can make a big difference by actively pulling moisture out of the air.
- Use mold-resistant materials: When it’s time for a refresh or renovation, opt for mold-resistant primer and paint. These products contain additives that inhibit mold growth.
Dealing with persistent mold issues, especially if they cover a large area, might mean there’s a hidden water problem. It’s worth checking for any slow leaks in pipes or issues with the roof or walls that could be feeding the mold, even after you’ve cleaned it.
Maintaining a Mold-Free Environment
Keeping your bathroom consistently dry and well-ventilated is key. Think about your bathroom like a plant – it needs the right conditions to thrive, and mold definitely doesn’t. Regularly inspect areas prone to moisture, like around the shower head or any vents. If you spot any dampness, address it immediately.
- Regular cleaning: Don’t let grime build up, as mold can feed on organic matter.
- Check for leaks: Periodically look for any signs of water damage or leaks from plumbing or the roof. Fixing these promptly stops mold before it starts.
- Improve airflow: Beyond just the fan, ensure vents aren’t blocked and that air can move freely.
If you’re finding that mold keeps returning despite your best efforts, it might be time to look into professional mold remediation services for a more thorough assessment and treatment plan.
Knowing When to Call Professionals
Sometimes, you can handle mold yourself. A small spot here or there? No big deal, grab your gloves and get to it. But there are definitely times when you should just pick up the phone and call someone who does this for a living. It’s not about giving up; it’s about being smart and safe.
Assessing the Extent of Mold Growth
If you look up and see a little fuzzy patch, that’s one thing. But if the mold covers a significant area, you might have a bigger problem on your hands. Generally, if the mold growth spans more than 10 square feet, it’s time to consider professional help. That’s roughly a 3-foot by 3-foot area. Trying to tackle something that large yourself can be tough and might not get rid of it all, plus you risk spreading spores around your home. It’s better to let the pros handle extensive mold infestations, as they have the right gear and know-how to remove it safely and effectively. They can also help identify if there are deeper issues causing the mold, like hidden water damage. For more on what professionals can do, you can look into professional mold remediation services.
Recognizing Persistent Mold Issues
Did you clean the ceiling, and a week later, it’s back? That’s a red flag. Mold that keeps coming back, no matter how many times you scrub it, usually means there’s an ongoing moisture problem that you haven’t found yet. This could be a slow leak in the pipes above, condensation issues you can’t see, or poor ventilation that’s never been fixed. Professionals can do a more thorough inspection to find the root cause of the moisture and fix it properly. Without addressing the source, the mold will just keep showing up.
When DIY Is Not Enough
There are a few other signs that tell you it’s time to step back and let the experts take over. If you or anyone in your household starts having weird health issues like headaches, breathing trouble, or allergy flare-ups that seem to get worse when you’re home, mold could be the culprit. Also, if the mold seems to have soaked into the ceiling material itself, making it soft or damaged, that’s a sign it’s gone deeper than just the surface. In these situations, it’s not just about cleaning; it’s about protecting your health and the integrity of your home. Professionals are trained to deal with these complex situations and can help restore your indoor air quality.
Sometimes, the best solution isn’t the one you can do yourself. Knowing your limits and when to call for backup is a sign of good judgment, especially when it comes to your home’s health and safety. It’s about getting the job done right and preventing future headaches.
Keep Your Bathroom Fresh and Mold-Free
Tackling mold on your bathroom ceiling might seem like a big job, but as we’ve seen, it’s totally doable with the right approach. Remember to always protect yourself with gloves and a mask, and choose a cleaning solution that works for you, whether it’s a natural option like vinegar or a store-bought cleaner. The key is to get rid of the mold and then, just as importantly, figure out why it showed up in the first place. Improving ventilation, fixing any leaks, and keeping things dry are your best bets for stopping mold from making a comeback. A little regular effort goes a long way in keeping your bathroom clean, healthy, and looking its best.
Frequently Asked Questions
What makes mold grow on bathroom ceilings in the first place?
Mold loves damp, warm places. Bathrooms are usually steamy from showers and baths, and if there’s not enough air moving around, that moisture can get trapped. This dampness, along with things like dust or even paint on the ceiling, gives mold the perfect spot to start growing. Leaky pipes or a roof leak can also add extra moisture.
Is it safe to clean mold off my ceiling myself?
For small patches of mold, usually less than 10 square feet, it’s generally safe to clean it yourself. Just make sure you wear protective gear like gloves, goggles, and a mask to avoid breathing in mold bits or getting chemicals on your skin. If the mold covers a big area or keeps coming back, it’s better to get professional help.
What are some simple ways to get rid of mold without using strong chemicals?
You can try using common household items! White vinegar works well; just spray it on the mold, let it sit for a bit, then scrub and wipe it off. Hydrogen peroxide (the kind you get at the drugstore) is another good option – spray it on, let it bubble, then wipe it clean. Baking soda mixed with water can also help scrub away mold.
How can I stop mold from growing back on my bathroom ceiling?
The key is to keep things dry and airy. Always turn on your bathroom fan during and after showers, and leave the door open when you can to let moisture escape. Wipe down any wet surfaces, and if your bathroom is often very humid, consider getting a dehumidifier. Using paint that’s made to resist mold can also help.
Can mold on the ceiling cause health problems?
Yes, mold can cause issues for some people. Breathing in mold spores can lead to allergy symptoms like sneezing, itchy eyes, or a runny nose. It can also trigger asthma attacks or breathing problems for others. That’s why it’s important to clean it up safely and try to prevent it from growing in the first place.
When should I call a professional to deal with ceiling mold?
You should call a professional if the mold covers a large area (more than 10 square feet), if it keeps reappearing no matter what you do, or if you suspect it’s linked to a serious water leak or damage inside your walls. Also, if anyone in your home has health problems that seem to be getting worse because of the mold, it’s best to get expert help.