Wood floors look great, they really do. But they can get messed up pretty fast if water gets on them. A leaky pipe, a spilled drink, or even a flood can ruin your nice floors if you don’t deal with it right away. Knowing how to fix water damage on wood floor is a good skill to have. This guide will walk you through what to do, from the first wet spot to making your floor look good again.
Key Takeaways
- Act fast to stop the water source and remove standing water to prevent further damage.
- Assess the damage carefully, looking for visible signs and hidden moisture, to decide on the repair approach.
- Properly dry the area using fans and dehumidifiers, ensuring the subfloor is also dry, before cleaning.
- Address minor damage like stains or slight warping with specific cleaning and repair techniques, or consider replacing boards for severe issues.
- Prevent future problems by maintaining humidity levels, ensuring good ventilation, and regularly inspecting your floors.
Immediate Actions for Water Damaged Wood Floors
Okay, so you’ve found water on your wood floors. Don’t panic! The absolute first thing you need to do is stop the water from coming in. Seriously, this is the most important step. If it’s a leaky pipe under the sink or a busted appliance hose, shut it off right away. If it’s coming from outside, like a window leak, you need to block that too.
Once the water source is cut off, you’ve got to get rid of any standing water. Grab some old towels, a mop, or even a wet/dry vacuum if you have one. The goal here is to soak up as much water as possible, as fast as possible. The longer water sits on your wood floors, the more it’s going to soak in and cause problems like warping or staining.
After you’ve mopped up the puddles, it’s time to start drying the area. This is where fans and dehumidifiers come in handy.
- Use fans: Point them directly at the wet spots to get air circulating. Ceiling fans work, but portable fans are even better for targeting specific areas.
- Dehumidifiers: These machines pull moisture right out of the air, which is exactly what you need. Place one in the room and let it run.
- Open windows (if weather permits): Fresh air circulation can help a lot, but only if it’s not humid outside.
Remember, the clock is ticking. The sooner you act, the better your chances of avoiding major damage. Addressing hardwood floor water damage requires immediate action within the first 24-48 hours. Swift intervention is crucial for effective repair and mitigation of further issues.
Don’t forget to move any rugs or furniture off the wet area. If water got underneath them, it’s trapped and will just keep damaging the wood. Lifting furniture slightly can help air get underneath too. If you suspect water has gotten under the boards and into the subfloor, you might need to pull up a board to check. This is where things can get a bit more involved, but for now, focus on getting that surface water gone and the air moving. Swift intervention is crucial for effective repair and mitigation of further issues.
Assessing the Extent of Wood Floor Water Damage
Okay, so you’ve stopped the leak and mopped up the standing water. Now comes the part where you figure out just how bad things really are. This isn’t always as straightforward as it looks, because water can sneak around and hide where you can’t see it. It’s super important to get a clear picture before you start any repairs.
Identify Visible Signs of Damage
First, just walk around and look. What do you see? Sometimes the damage is obvious, other times it’s more subtle. Keep an eye out for:
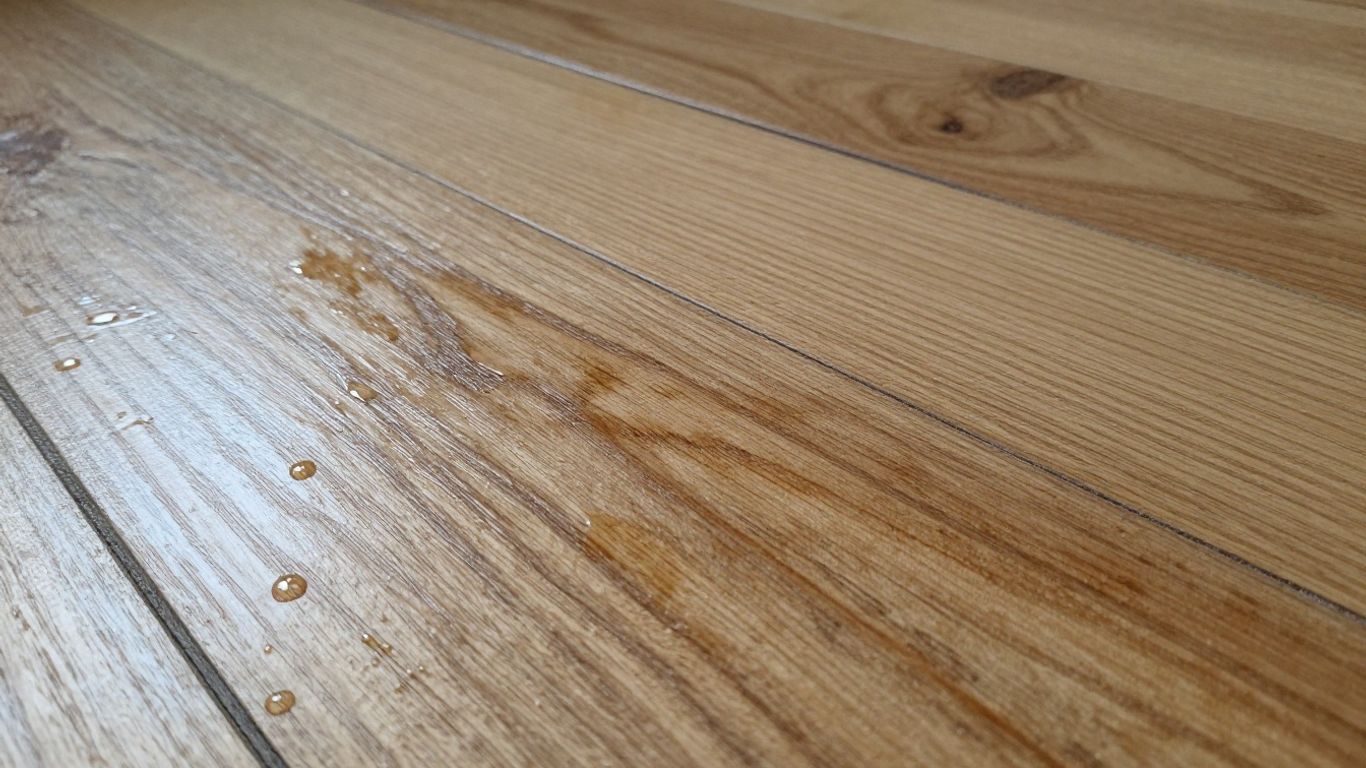
- Discoloration: Dark spots usually mean water has soaked in deep, while white or cloudy patches might just be on the surface finish.
- Warping or Cupping: This is when the wood planks start to bend. Cupping means the edges of the board are higher than the center, like a shallow bowl. Warping is more of a general bend or twist.
- Buckling: This is the really bad stuff, where the floorboards lift up off the subfloor, sometimes quite dramatically.
- Mold or Mildew: Any fuzzy growth or a persistent musty smell is a big red flag.
Detect Hidden Moisture with Tools
Just because the surface looks okay doesn’t mean it’s dry underneath. Water can seep down into the wood and the subfloor, creating problems later on. This is where tools come in handy. A moisture meter is your best friend here. You just stick the probes into the wood, and it gives you a reading of how much moisture is present. Professionals often use more advanced equipment to get a really detailed look at moisture levels, which helps them figure out exactly where the water has gone detect hidden moisture.
Here’s a quick look at what different moisture meter readings might mean for hardwood floors:
| Reading (%) | Condition |
|---|---|
| 0-12 | Dry |
| 12-16 | Slightly Damp |
| 16-20 | Damp |
| 20+ | Very Wet / Wet |
Remember, even if the surface looks dry, readings above 16% in the wood or subfloor mean you’ve got a problem that needs attention. The goal is to get everything back to a normal, dry state.
Determine if Boards Need Replacement
After you’ve checked for visible signs and used your tools to find hidden moisture, you can start deciding what needs to be done. If you’re only seeing minor surface stains and the wood is still structurally sound, you might be able to get away with just drying and refinishing. But if boards are severely warped, stained through and through, or showing signs of mold, they probably need to come out. It’s better to replace a few bad boards now than to let the problem spread and cause more damage later. If the damage is widespread, you might need to think about professional help, especially if mold is a concern mold removal supplies.
Drying and Cleaning Water Damaged Wood
Okay, so the water’s stopped, and you’ve mopped up the worst of it. Now comes the part where we really get things dry and clean. This is super important because any lingering moisture is just inviting trouble, like mold or more damage to the wood itself. Getting everything bone dry is the absolute priority before you even think about fixing things.
Utilize Fans and Dehumidifiers
This is where you bring out the heavy artillery for drying. You’ll want to set up fans to keep the air moving constantly over the affected areas. Think of it like giving the wood a good breeze to help it evaporate. Box fans or even ceiling fans work well for this. Alongside the fans, a dehumidifier is your best friend. It pulls moisture right out of the air, which speeds up the drying process significantly. You might need to run these for a few days, so be patient. Keep the room sealed up as much as possible while the dehumidifier is running to make it more effective.
Ensure Subfloor is Completely Dry
It’s not just the surface of the wood floor that needs to be dry; the subfloor underneath is just as critical. Water can seep down between the boards and get trapped. If you suspect a lot of water got through, you might need to lift a few boards to check. If the subfloor is still damp, you need to keep drying it out. This might take longer than you think, and sometimes industrial-grade drying equipment is needed, especially if the water damage was extensive. A damp subfloor is a breeding ground for mold and can cause the wood to warp from below. You can use fans and dehumidifiers pointed at the exposed subfloor, but if it’s really soaked, it’s worth considering professional help to dry the subfloor properly.
Clean Away Dirt and Mold Spores
Once you’re confident the wood and subfloor are dry, it’s time for a good cleaning. You’ll want to get rid of any dirt, grime, or potential mold spores that might have settled in. For general cleaning, a pH-neutral cleaner mixed with warm water and a damp (not wet!) microfiber mop or cloth works well. If you see any signs of mold, a solution of white vinegar and water can be effective. Just wipe gently and, again, dry the area thoroughly afterward. Never soak the floor, even when cleaning. If you’re dealing with stubborn mold, there are wood-safe mold removers, but always test them in an inconspicuous spot first. Remember, proper cleaning is key to preventing mold growth and keeping your home healthy.
Repairing Minor Water Damage on Wood Floors
So, you’ve managed to dry things out, and thankfully, the damage isn’t a total disaster. That’s good news! Minor water issues on wood floors often leave behind tell-tale signs like white spots, dark marks, or slight changes in the wood’s shape. The good news is, with a little effort, you can often fix these yourself.
Address White Stains on the Finish
White or cloudy spots are usually a sign that water got trapped in the top layer of your floor’s finish. It hasn’t gone deep into the wood itself, which is a relief. The key here is to gently lift that trapped moisture.
Here’s a simple way to tackle them:
- Grab a soft cloth and dab a little mineral spirits or denatured alcohol onto it. Don’t soak the cloth, just get it damp.
- Gently rub the white stain. You should see it start to fade as you work.
- Once the stain is gone, wipe the area with a clean, damp cloth and then dry it thoroughly with a towel.
If that doesn’t quite do the trick, you can try a paste of baking soda and a little water. Use a soft cloth to gently buff the stain. Be careful not to scrub too hard, as you don’t want to scratch the finish.
Remember, patience is key. Work slowly and check your progress often. It’s better to do multiple light passes than one aggressive one that could cause more harm.
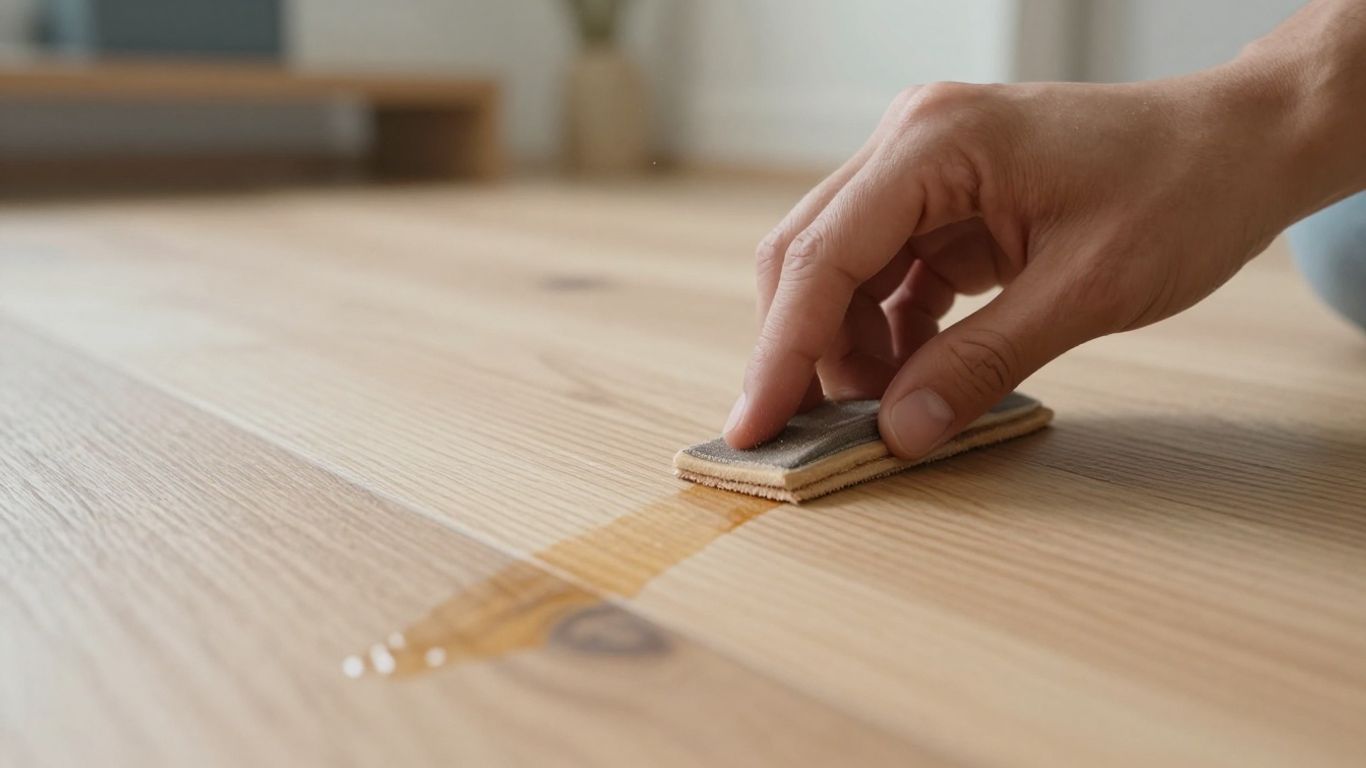
Treat Dark Stains Penetrating the Wood
Dark stains mean the water has soaked into the wood itself. This is a bit more involved than a surface stain, but it’s usually fixable. You’ll need to do some light sanding to get to the clean wood underneath.
- Use fine-grit sandpaper (around 220-grit) to lightly sand the stained area. Just focus on the dark spot.
- Wipe away all the dust with a slightly damp cloth.
- Apply a wood stain that matches your floor’s original color. Test it in an inconspicuous spot first to make sure it looks right.
- Once the stain is dry, apply a protective polyurethane finish to seal it. You might need a couple of coats for good coverage.
If the stain is really deep and doesn’t come out with sanding, you might have to consider replacing the affected board. For minor issues, though, this process usually works well.
Correct Slight Warping or Cupping
Sometimes, after drying, wood boards might not lie perfectly flat. You might notice a slight upward curve at the edges, known as cupping. If it’s not too severe, you can often correct this.
- Flattening: If the edges are slightly raised, try sanding them down gently with fine-grit sandpaper. You can also try placing heavy objects, like books, on the cupped area for a day or two to help press it flat.
- Smoothing: After addressing any warping, you can use a wood floor polish to help smooth out the appearance and blend the area with the rest of your floor.
For more significant warping, you might need to look into professional help or consider replacing the boards. But for minor changes, these steps can often bring your floor back to looking its best. If you’re unsure about matching stains or finishes, checking out resources on wood floor refinishing can offer more detailed guidance.
Addressing Severe Water Damage on Wood Floors
When water damage goes beyond a simple spill and really takes hold, it’s time to bring out the heavy hitters. We’re talking about situations where boards are visibly warped, stained deeply, or even showing signs of mold. This isn’t a ‘wait and see’ kind of problem; it needs a direct approach.
Remove and Replace Damaged Boards
If a few planks are beyond saving, the best course of action is to remove them. This stops the problem from spreading and gives you a clean slate to work with. You’ll want to carefully pry up the damaged boards, making sure not to disturb the surrounding ones too much. When you get new boards, try your best to match the thickness, grain, and color of your existing floor. It can be tricky, but it makes a big difference in the final look. Sometimes, you might need to replace a whole section if the damage is widespread.
Prepare for Subfloor Mold Remediation
Water that gets under the floorboards can create a perfect breeding ground for mold. If you suspect mold, or if the area was wet for a long time, you absolutely need to address it. Mold isn’t just unsightly; it can cause health problems and further damage your home’s structure. This is where you might need to bring in specialists who know how to handle mold cleanup safely and effectively. They have the tools and knowledge to get rid of it completely and make sure it doesn’t come back.
Consider Professional Restoration Services
Honestly, sometimes severe water damage is just too much for a DIY project. If your floors are buckling, have widespread mold, or if you’re just not comfortable tackling the repairs yourself, it’s smart to call in the pros. They have specialized equipment and experience to deal with water-damaged hardwood floors and can often restore them to a condition you might not think is possible. It might cost a bit more upfront, but it can save you a lot of headaches and potential future problems.
Restoring the Wood Floor’s Appearance
After all the hard work of drying and repairing, it’s time to make your wood floors look like they did before the water incident. This part is all about bringing back that smooth, uniform look and protecting your investment.
Sanding to Smooth Surfaces
If you had to replace boards or if there’s any unevenness left from the damage and repairs, sanding is your next step. You’ll want to use a floor sander, maybe even a drum sander for larger areas and an edge sander for those tricky spots near walls. The goal here is to get everything level. Start with a coarser grit sandpaper, like 60-grit, and then move to finer grits, such as 120-grit, to get a really smooth surface. It’s a dusty job, so make sure you’ve got good ventilation and wear a mask. After sanding, vacuum up all the dust thoroughly.
Filling Gaps and Cracks
As wood dries, it can shrink, sometimes leaving small gaps or cracks between the boards. You’ll want to fill these to create a solid surface for the finish. Pick a wood filler that matches your floor’s color as closely as possible. Apply it with a putty knife, pressing it into the gaps. Wipe away any excess filler before it dries. If you’re having trouble finding a perfect match, you can always sand and stain later to blend it in.
Applying Matching Stain and Finish
Now for the part that really makes the floor look whole again. If you had to replace boards or if the original stain got damaged, you’ll need to apply a new stain. Try to match the original color as best you can. Test it on a scrap piece or an inconspicuous area first. Once the stain is dry, it’s time for the protective finish. Polyurethane is a common choice. You’ll likely need to apply a couple of coats, letting each one dry completely according to the product instructions. This layer is what protects the wood from future spills and wear.
Bringing Back Shine with Polish
Your floor is almost there! Once the final coat of finish has fully cured – and this can take a few days, so be patient – you can apply a wood floor polish. This step adds that final bit of shine and can help mask any minor imperfections or scuffs that might have happened during the repair process. Use a microfiber mop for application and buff gently. It’s like the final detail that makes everything look brand new again.
Remember, the goal is not just to fix the damage but to make the floor look as uniform and attractive as it did before. Taking your time with the sanding, staining, and finishing steps will pay off in the long run.
Preventative Measures for Wood Floor Water Damage
Wood floors look great, but they can be tricky when it comes to moisture. Taking a few steps now can save you a lot of headaches later. It’s all about being proactive and keeping an eye out for potential problems before they get out of hand.
Maintain Optimal Indoor Humidity Levels
Keeping your home’s humidity in the right range is super important for your wood floors. Too much moisture can make the wood swell, and too little can cause it to dry out and crack. The sweet spot for most wood floors is between 35% and 55% humidity. You can use a hygrometer to check your levels. In drier months, a humidifier can add moisture, while a dehumidifier works wonders during muggy summer days. This balance helps prevent warping and gaps from forming.
Ensure Proper Home Ventilation
Good airflow throughout your house is more than just about comfort; it’s key for your floors too. When air can move freely, it helps keep moisture levels even and discourages mold growth. Make sure your home’s ventilation systems are working as they should. This includes checking that vents aren’t blocked and that fans are operational. Poor ventilation can trap moisture, creating a damp environment where mold can start to take hold, especially in areas like basements or bathrooms.
Use Mats and Rugs Strategically
Think of mats and rugs as your first line of defense. Placing them at entryways can catch a lot of dirt and water that would otherwise get tracked onto your wood floors. This simple step reduces the amount of moisture and grime that your floors have to deal with daily. However, be careful with rubber-backed mats, as they can sometimes trap moisture underneath, leading to their own set of problems. It’s best to opt for breathable materials or lift mats regularly to let the floor underneath air out.
Conduct Regular Floor Inspections
Don’t just wait for a spill to happen. Make it a habit to give your wood floors a quick look-over now and then. Pay attention to areas that are more prone to moisture, like near sinks, dishwashers, or in basements. Look for any signs of discoloration, warping, or even a faint musty smell. Catching small issues early, like a tiny leak or a bit of moisture buildup, can prevent them from turning into major water damage problems. It’s also a good idea to reapply sealant every few years, as the protective layer wears down over time, leaving your wood more exposed.
Keeping your wood floors in good shape means paying attention to the little things. Controlling humidity, ensuring good airflow, using mats wisely, and doing regular check-ups are all simple yet effective ways to protect your investment from water damage. It’s much easier to prevent a problem than to fix one.
Bringing Your Floors Back to Life
So, there you have it. Dealing with water damage on your wood floors can seem like a big headache, but with a little know-how and some quick action, you can totally bring them back from the brink. Remember, the faster you act, the better your chances of avoiding major issues like warping or mold. Whether it’s a small spill you can wipe up or a bigger job that needs some sanding and refinishing, taking these steps can save your beautiful floors. And hey, a little bit of prevention goes a long way too – keep an eye out for leaks and clean up spills right away. Your floors will thank you for it.
Frequently Asked Questions
How quickly do I need to deal with water on my wood floors?
You need to act super fast! The longer water sits on wood, the more damage it can cause. Think of it like a sponge – the more it soaks up, the more it swells and can get moldy. Get that water up and start drying right away!
What are the first signs that my wood floor has water damage?
Look for things like dark or light spots where the water sat, boards that start to bend or curl up at the edges, or even a musty smell. Sometimes, the floor might feel soft or spongy in spots. It’s important to check everywhere, even under rugs or furniture.
Can I fix small water stains myself?
Yes, for light stains, you often can! White or cloudy stains usually mean the finish got wet. You can try gently rubbing them with a soft cloth dipped in mineral spirits or rubbing alcohol. For darker stains that went deeper, you might need to lightly sand and re-stain the spot.
When should I call a professional for water damage?
If a lot of water has soaked the floor, or if you see signs of buckling (boards lifting up) or mold, it’s best to call the pros. They have special tools to dry everything out completely and can handle replacing boards or dealing with mold safely.
How do I dry out a wood floor after water damage?
After removing standing water with towels or a wet vacuum, use fans and a dehumidifier to speed up drying. Open windows if it’s not too humid outside. Keep the air moving constantly over the wet spots. It might take a few days to get everything totally dry.
How can I stop my wood floors from getting damaged by water in the future?
Keep the air in your home at a good humidity level, usually between 35% and 55%. Use mats at entryways to catch water and dirt. Check regularly for leaks from pipes or appliances, and clean up spills immediately. Making sure your home is well-ventilated also helps a lot.