Dealing with water damage on drywall can feel like a real headache. You see that stain, maybe it’s a bit soft, and suddenly you’re wondering if you can fix it yourself or if it’s time to call in the pros. It’s not always straightforward, and doing it wrong can lead to bigger problems down the road, like mold or even structural issues. This guide will walk you through how to assess the damage, figure out if you can repair water damage drywall on your own, and what to do if the situation calls for professional help. We’ll cover the whole process, from drying things out to making the final paint touch-ups, and even how to stop it from happening again.
Key Takeaways
- Thoroughly check the extent of water damage using a moisture meter and by testing the drywall’s firmness. Document everything with photos for insurance.
- Minor water damage (clean water, less than 24 hours wet, small area, firm drywall) might be a DIY repair job. Anything more serious needs professional attention.
- Before repairing, ensure the area is completely dry, usually taking 24-72 hours with fans and dehumidifiers. Then, prep the surface, prime it with a stain-blocker, and apply joint compound if needed.
- Significant damage like sagging, crumbling drywall, visible mold, or water exposure over 48 hours means you need to replace the affected sections. Professionals handle this safely and effectively.
- Prevent future issues by fixing leaks immediately, improving ventilation, controlling humidity, and doing regular checks on areas prone to moisture.
Assessing Drywall Water Damage
So, you’ve spotted a water stain on your wall. Bummer. But before you panic or grab a paint can, it’s super important to really check out what’s going on. Getting a good handle on the extent of the damage is the first real step to fixing it right. You don’t want to just slap some spackle on it and hope for the best, especially if the water has been sitting there for a while.
Documenting the Extent of Water Intrusion
First things first, grab your phone and take a bunch of pictures. Get shots of the stain, any drips, where the water might be coming from, and the general area. If you have a ruler or tape measure handy, put it next to the damage in some photos so people can see just how big the problem is. This is really helpful if you end up needing to file an insurance claim or get a quote from a pro. It’s like creating a visual diary of the mess.
Measuring Moisture Levels for Accurate Assessment
This is where things get a bit more technical, but it’s worth it. You’ll want to get a moisture meter. They aren’t too expensive and you can find them at most hardware stores. You just press it against the drywall in a few spots – the stained area and some of the dry spots around it. If the meter shows readings above 1%, there’s definitely moisture in there. Anything over 5% means it’s pretty soaked. This tool is great because it can find water that you can’t even see, which is key to stopping mold before it starts. You can find reliable moisture meters at local hardware stores.
Identifying Structural Indicators of Damage
Now, let’s do a little hands-on inspection. Gently push on the damp spots with your finger or the handle of a screwdriver. Does it feel firm, or is it soft and squishy? You’re looking for:
- Minor Damage: Light discoloration, maybe a little damp to the touch, but the wall still feels solid.
- Moderate Damage: Darker stains, paint that’s starting to bubble up, and definite soft spots when you press.
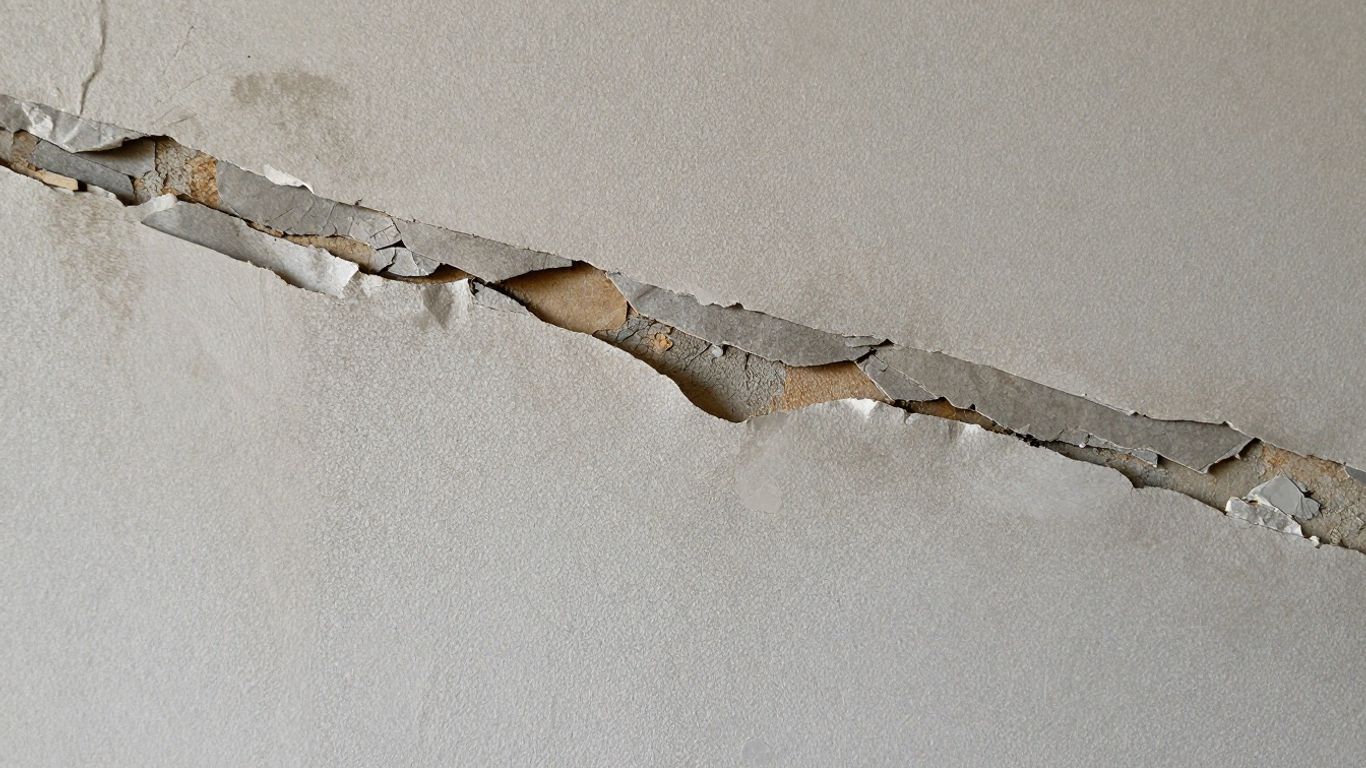
- Severe Damage: The wall might be sagging, the texture could be crumbling, you might see mold, or there’s a musty smell.
Be aware that water damage can spread behind the drywall, making the problem bigger than it looks on the surface. Always check a bit beyond the visible stain.
Testing Drywall Integrity and Firmness
This step is all about how the drywall feels. Take that screwdriver handle again and give the suspect areas a gentle poke. If it feels solid and doesn’t give way, that’s a good sign. But if it feels spongy, dents easily, or even breaks through with light pressure, the drywall has lost its strength. This is a pretty clear indicator that the gypsum core has been compromised by the water. If you’re dealing with anything beyond minor discoloration and the drywall feels weak, it’s probably time to think about replacement rather than just a patch job. Remember, documenting everything is also important for insurance purposes.
Determining When to Repair Water Damaged Drywall
So, you’ve found some water damage on your drywall. Now comes the big question: can you fix it yourself, or is it time to call in the pros? It really depends on a few things.
Criteria for Minor DIY Drywall Repair
First off, let’s talk about when you might be able to tackle this yourself. If the water exposure was short, like less than a day, and the water itself was clean (think a leaky pipe, not a flooded basement), you might be in luck. Also, if the damaged spot is pretty small, say less than a couple of square feet, and the drywall still feels solid when you press on it – no squishy spots or crumbling – then a DIY repair is probably doable. The key is that the drywall’s structure hasn’t been seriously compromised. If the paint is just discolored but not peeling, and you don’t see any mold or smell anything funky, you’re likely in the clear for a patch-up job.
Understanding Water Damage Categories
Water damage isn’t all the same. The source of the water really matters. We usually break it down into three categories:
- Category 1 (Clean Water): This is your typical stuff, like leaks from supply lines or rainwater. If you catch it fast and it’s clean, DIY is often an option.
- Category 2 (Gray Water): This comes from things like washing machines or dishwashers. It’s a bit riskier, and you might want to get a professional opinion.
- Category 3 (Black Water): This is the nasty stuff – sewage or floodwater. Never try to DIY this. It’s a serious health hazard and needs immediate professional attention.
The water category dictates the risk. Clean water damage is generally the easiest to handle, but gray and black water introduce contaminants that require specialized cleaning and removal to prevent health issues.
When Professional Intervention is Necessary
There are definitely times when you should step away and let the experts handle it. If the drywall feels soft, spongy, or is actually crumbling when you touch it, that’s a big red flag. Any sign of sagging or warping means the structure is likely damaged. And if you see mold, or even just suspect it because of a persistent musty smell after drying, it’s time to call for help. If the water was contaminated (Category 2 or 3), or the damaged area is larger than a small patch, professional help is the way to go. They have the tools and knowledge to deal with hidden mold growth and ensure the area is truly safe and dry.
Basically, if the drywall itself is compromised – soft, sagging, or moldy – replacement is usually the safer bet. Trying to patch over severely damaged drywall is like putting a band-aid on a broken bone; it won’t hold up and will likely cause more problems down the line.
The Process for Repairing Minor Drywall Water Damage
Okay, so you’ve assessed the situation, and thankfully, it looks like a minor issue. The water exposure wasn’t too long, the water was clean, and the drywall still feels pretty solid. That’s good news! It means you can probably tackle this yourself without calling in the big guns. The key here is making sure the area is completely dry before you do anything else.
Ensuring Complete Area Drying
This is probably the most important step, and it takes patience. You can’t rush drying. You’ll want to set up fans and dehumidifiers to really get the air moving around the affected spot. Point them directly at the damp drywall. You’ll need to run these pretty much non-stop for at least 24 to 72 hours. Keep checking with a moisture meter; you’re looking for readings to get back down to normal levels, ideally below 1%. If the weather’s nice, open up windows to help with ventilation. Good airflow is your best friend right now.
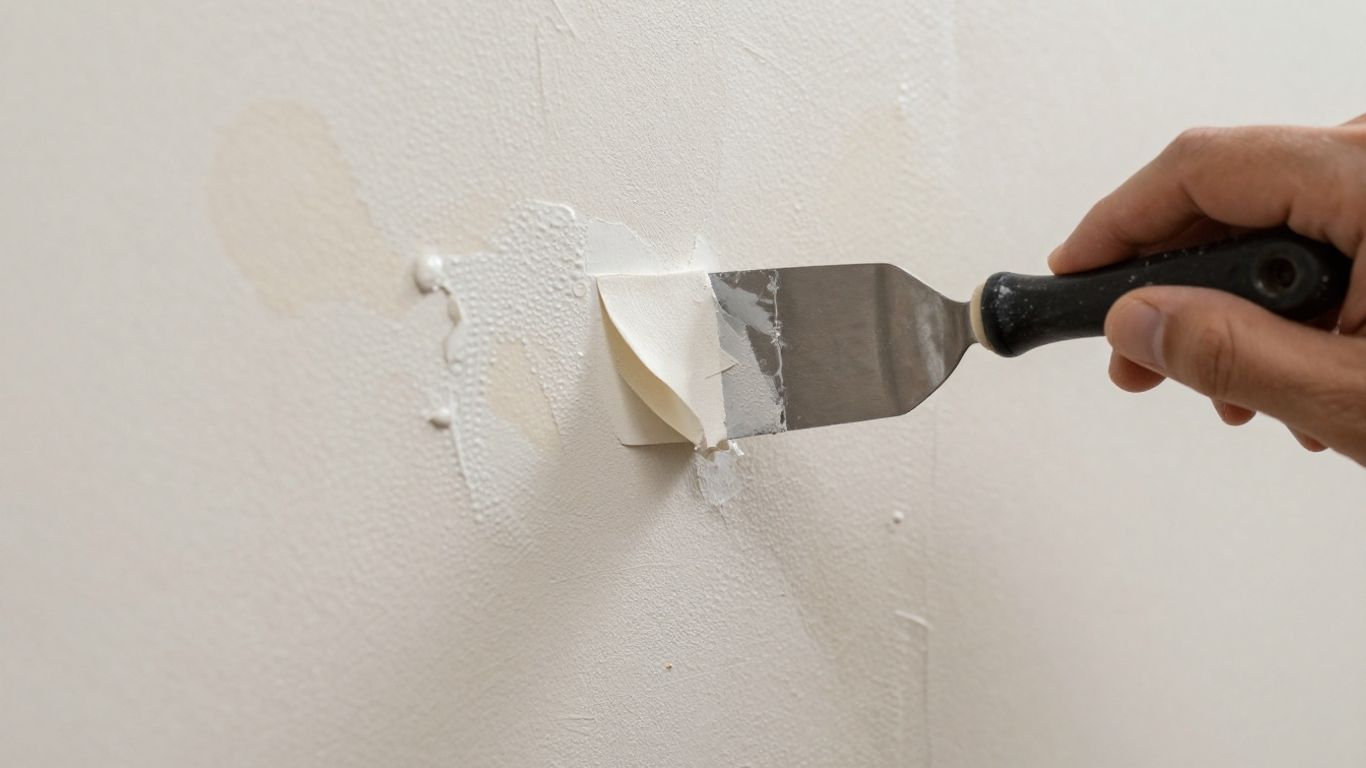
Preparing Surfaces for Repair
Once you’re absolutely sure the drywall is dry, it’s time to prep. If there are any rough spots or areas where the paper has bubbled up a bit, gently sand them down with some 120-grit sandpaper. After sanding, wipe away all the dust with a damp cloth and let it dry again. Now, you’ll want to apply a stain-blocking primer. This is super important because it stops those ugly water stains from showing through your new paint later on. Think of it as a shield for your paint job.
Applying Primer and Joint Compound
If the drywall paper has separated a little, you might need a bit of joint compound. Apply a thin, even layer over the affected spot. Let it dry completely according to the product instructions. Once dry, give it a light sanding to make it smooth. Wipe away the dust. If you had to use joint compound, you’ll want to apply another coat of that stain-blocking primer over the patched area. After the primer dries, you’re ready for paint. Apply two coats of paint that match your existing wall color. Take your time and try to get an even finish.
Finishing Touches with Paint
This is where it all comes together. After your primer is dry and you’ve applied your first coat of paint, let it dry. Then, apply a second coat. Make sure you’re using a paint that matches your existing wall color as closely as possible. Sometimes, even with the best efforts, a small patch can look a little different. If you notice any unevenness or texture differences, you might need to do some very light sanding and touch up again. The goal is to make the repair blend in so you can barely tell it was ever there. If you’re dealing with a larger area or suspect mold, it’s best to get professional mold removal advice.
Remember, even minor water damage can sometimes hide bigger issues. Always trust your gut. If something feels off, or if the damage seems to be spreading, it’s better to stop and get a professional opinion. Trying to fix something that’s actually a bigger problem can lead to more headaches down the road.
When Drywall Replacement is Essential
Sometimes, patching just won’t cut it. When water damage goes beyond a simple surface stain or a small hole, it’s time to think about replacing the drywall altogether. This isn’t about being lazy; it’s about doing the job right so you don’t have to revisit it later.
Signs Indicating Significant Water Damage
If you’re looking at your drywall and it’s showing some serious distress, replacement is likely your best bet. Here are the big red flags:
- Swelling or Softness: If the drywall feels spongy or has visibly puffed out, the gypsum core has likely absorbed too much water and lost its integrity. It’s not going to firm up again.
- Crumbling or Delamination: When the drywall starts to break apart, either the gypsum core turning to dust or the paper layers separating, it’s beyond repair. This means the material itself is compromised.
- Mold Growth: Surface mold is one thing, but if you see mold growing within the drywall material, or if there’s a persistent musty smell indicating hidden mold, you need to cut it out. Addressing mold promptly is crucial to prevent further issues [cf95].
- Widespread Damage: If more than about half of a drywall sheet is affected by water, it’s often more practical and results in a better finish to replace the entire panel rather than trying to patch multiple spots.
- Sagging or Stains: While minor stains might be covered, significant discoloration or visible sagging, especially on ceilings, indicates that the drywall is weakening and might fail.
The Importance of Replacing Compromised Drywall
Trying to repair drywall that’s fundamentally damaged is like building on a shaky foundation. It might look okay for a little while, but it’s bound to cause problems down the road. Compromised drywall can lead to structural issues, mold growth, and a poor finish that just won’t last. When the gypsum core breaks down from water, it loses its strength and its ability to hold paint or texture properly. Plus, if there’s hidden mold within the material, you’re just sealing in a health hazard.
When drywall has been significantly weakened by water, it’s no longer a reliable building material. Its ability to support itself and provide a stable surface for finishes is gone. Attempting to patch or cover up this kind of damage is a temporary fix at best and can lead to more extensive and costly repairs later on.
Understanding the Professional Replacement Process
While you might be able to tackle small drywall repairs yourself, a full replacement often involves more than just slapping up a new piece of board. Professionals will:
- Identify and Fix the Source: Before any replacement happens, the original water leak or source of moisture must be completely stopped. This might involve roof repairs [4e62] or plumbing fixes.
- Remove Damaged Material: They’ll carefully cut out the affected drywall, making sure to remove all the compromised material and a bit of the surrounding area to ensure they’re working with solid drywall.
- Inspect Behind the Wall: While the drywall is open, they’ll check the studs, insulation, and any wiring or plumbing for hidden damage or mold.
- Install New Drywall: A new piece of drywall is cut to fit and securely fastened to the studs.
- Tape, Mud, and Sand: The seams are taped, joint compound (mud) is applied in layers, and then sanded smooth to create a seamless finish.
- Prime and Paint: Once the mudding is done and the surface is smooth, it’s primed and painted to match the rest of the wall or ceiling.
Preventing Future Water Damage to Drywall
After dealing with water damage, the last thing you want is for it to happen again. Taking some smart steps now can save you a lot of headaches and money down the road. It’s all about being proactive.
Addressing Moisture Sources Promptly
The first line of defense is fixing whatever caused the water problem in the first place. This might mean repairing a leaky pipe under the sink, sealing up cracks in your foundation, or getting that old roof checked out. Don’t let small leaks linger; they can turn into big issues surprisingly fast. Think of it like this: if you see a tiny drip from a faucet, you fix it. You don’t wait until the whole cabinet is waterlogged, right? The same idea applies to your walls. Addressing the root cause quickly is key to stopping further damage and preventing future problems. Sometimes, this might involve looking into your home’s drainage systems to make sure water is flowing away from your foundation.
Improving Ventilation and Humidity Control
Keeping the air moving and the moisture levels down inside your home makes a big difference. Areas like bathrooms, kitchens, and basements are prone to higher humidity. Using exhaust fans when you shower or cook helps a lot. You can also use dehumidifiers, especially in basements or other damp spots, to keep the air from getting too thick with moisture. Aim to keep indoor humidity levels somewhere between 30% and 50%. Too much dampness can create a breeding ground for mold and weaken your drywall over time.
Implementing Regular Inspections and Maintenance
Make it a habit to walk around your home and just look. Check the areas where water damage has happened before, but also look at places that are often overlooked. This includes checking around windows and doors for any signs of leaks, looking at the base of walls, and even peeking into your attic or crawl spaces if you can. Catching a small issue early, like a bit of discoloration or a slightly soft spot, is much easier to fix than dealing with a large, soggy mess. A quick check every few months can really help.
It’s easy to forget about the walls once they look good again, but they need ongoing care. Think of it like maintaining a car; regular checks prevent breakdowns. For drywall, this means keeping an eye on humidity, making sure water drains away from the house, and just generally being aware of your home’s condition. Small efforts now mean fewer big repairs later.
Wrapping Up Your Drywall Repair
So, dealing with water damage on drywall can seem like a big headache, right? We’ve gone over how to figure out just how bad the damage is, whether you can tackle it yourself for small spots, or if it’s time to call in the pros for the bigger jobs. Remember, the most important thing is to fix whatever caused the leak in the first place. Then, make sure everything is totally dry before you even think about patching or painting. Taking your time and doing it right the first time will save you a lot of trouble down the road, and you’ll end up with walls that look good and are built to last. Don’t forget to keep an eye on things afterward, just to be safe.
Frequently Asked Questions
How long does it take for wet drywall to dry out completely?
Usually, drywall that’s been wet needs about 24 to 72 hours to dry fully. This is if you have good airflow and use a dehumidifier. The exact time depends on how much water got in, how humid the air is, and how well air can move around. It’s best to use a moisture meter to check that the moisture level is really low before you start fixing anything.
Can I just paint over drywall that has water stains?
No, you really shouldn’t paint over wet drywall or water stains without letting it dry completely and checking it first. Doing this just traps the moisture inside. This can lead to mold growing, the wall getting weaker over time, and the stains showing through your new paint. Always let it dry, make sure it’s still strong, and use a special primer that blocks stains before you paint.
What does it mean if my drywall feels ‘soft’?
When drywall feels ‘soft,’ it means the inside part, called the gypsum core, has become weak. This usually happens because of water. If you can push on the surface and it dents easily, feels squishy, or the paper is peeling off the inside, that drywall is damaged. It’s safer to replace it than try to fix it.
Do I have to replace drywall if I see mold on it?
It depends. If the mold is just on the surface and the drywall is still solid, you might be able to clean it and seal it. But if the mold has gotten into the drywall’s core or the paper is falling apart, it’s safer to replace that section. Always fix the reason for the water leak before you start any repairs.
Is it better to patch a small damaged area or replace the whole piece of drywall?
Patching is usually good for small, limited damage. Replacing the whole sheet of drywall is often a better choice if there are many damaged spots on one sheet, the water damage is spread out, or if you think the patched area won’t match the rest of the wall perfectly. Replacing ensures a stronger, more uniform finish.
When should I call a professional for drywall water damage?
You should definitely call a professional if the water soaked through the walls from the bottom up, if the water came from sewage or flooding, if many rooms or large parts of walls are affected, if you see or smell mold, if the drywall has been wet for more than two days, or if you suspect the wood framing behind the drywall is damaged. Trying to fix big problems yourself can be unsafe and might not be covered by insurance.