It can be really frustrating when spills or leaks leave your nice wood floors looking less than stellar. Water damage happens, but don’t panic. You can often fix it yourself with a few straightforward steps. This guide will walk you through how to fix a wood floor from water damage, covering everything from drying out the mess to making your floors look good again. We’ve got easy tips to get your floors looking great.
Key Takeaways
- First, figure out how bad the water damage is. Look for stains, warping, or mold to know what you’re dealing with.
- Stop the water source immediately. Whether it’s a leaky pipe or a spilled drink, stop more water from getting on the floor.
- Dry everything out thoroughly. Use fans and dehumidifiers, and be patient – drying can take weeks.
- For minor issues like water stains, try cleaning them gently. For deeper problems, you might need to sand or replace boards.
- Once repairs are done, restore the floor’s look by sanding, staining, and applying a protective finish.
Assess The Extent Of Water Damage
Alright, so your wood floor has met with some water. Before you panic and start ripping things up, the very first thing you need to do is figure out just how bad the situation is. This initial assessment is super important because it dictates every step that follows. Trying to fix something without knowing the full picture is like trying to bake a cake without a recipe – messy and usually ends in disaster.
Identify Signs of Moisture Intrusion
Water damage isn’t always obvious, like a big puddle. Sometimes it’s sneaky. You might notice:
- Discoloration: Look for dark spots, water rings, or a general darkening of the wood. Sometimes, especially if water sat on the surface, you might see white rings or a cloudy appearance in the finish.
- Changes in Texture/Shape: Boards might start to look a bit like a washboard, with the edges higher than the center (this is called cupping). In more severe cases, boards can lift up entirely, almost like little tents.
- Smells: A musty or moldy odor is a big red flag. It means moisture is likely trapped somewhere, probably out of sight.
- Soft Spots: If parts of the floor feel spongy or soft when you walk on them, that’s a sign the wood is starting to break down.
Determine Severity of Damage
Once you’ve spotted some signs, you need to gauge how widespread the problem is. Is it just a few surface stains, or has the water gone deep?
- Minor Damage: This usually involves surface stains or slight cupping that might resolve on its own once the floor dries. The wood itself is still solid.
- Moderate Damage: You’ll see more significant cupping that doesn’t go away, dark stains that have soaked into the wood grain, or maybe you’re starting to smell that musty odor. The wood might be starting to deform.
- Severe Damage: This is when boards are buckling (lifting way up), the wood feels soft and spongy, or you see visible mold. The subfloor underneath might also be affected.
Don’t just look at the surface. Water loves to hide. It can seep under boards and into the subfloor, causing problems you can’t see right away. That’s why checking for hidden moisture is key.
Utilize A Moisture Meter For Accuracy
Visual inspection is good, but for real accuracy, you need a tool. A moisture meter is your best friend here. These gadgets measure the water content in the wood. You’ll want to take readings in several spots across the affected area and also in a dry, unaffected part of your floor to get a baseline. This helps you understand how far the moisture has spread and if the floor is truly dry before you start any repairs. If you’re seeing readings significantly higher than your baseline, you’ve got more drying to do. This is especially important for checking the subfloor, as it can hold a lot more moisture than the surface boards.
Immediate Actions To Mitigate Water Intrusion
Okay, so you’ve found water on your wood floor. Don’t panic, but definitely don’t wait around either. The faster you act, the less damage you’ll likely end up with. Think of it like a race against time – moisture loves to creep into wood and cause all sorts of trouble.
Locate and Eliminate The Water Source
First things first, you absolutely have to stop the water from coming in. If it’s a leaky pipe under the sink, you need to shut off the water to that fixture or even the whole house if you have to. Is it an overflowing dishwasher or washing machine? Turn it off immediately. Maybe it’s rain coming in from a window or a roof issue? You’ll need to address that outside problem. Until you stop the source, you’re just chasing your tail.
Remove Standing Water Promptly
Got puddles? Get rid of them. Seriously, don’t let water just sit there. You can use towels, especially microfiber ones, to soak up smaller amounts. For bigger messes, a wet/dry shop vacuum is your best friend. If you have a lot of water, you might need to consider renting a stronger water extractor, but for most home situations, towels and a good vacuum will do the trick. Remember to move any rugs or furniture off the wet spots too, so air can get underneath them.
Enhance Air Circulation For Drying
Once the standing water is gone, you need to get air moving. Open up windows and doors if the weather permits – fresh air helps a lot. Turn on ceiling fans, or grab some portable box fans and aim them directly at the damp areas. Even a hairdryer on a cool setting can help speed things up for small spots. The goal here is to keep the air moving constantly over the wet wood to help it dry out faster. This is a key step in preventing mold and further damage. You can also use smart sensors to monitor humidity levels as you dry.
Don’t try to sand or refinish the floor while it’s still damp. You might think you’re fixing it, but you could actually be trapping moisture inside the wood, which will cause bigger problems down the road. Patience is key during the drying phase.
Thoroughly Dry The Affected Wood Flooring
Okay, so you’ve stopped the leak and mopped up the puddles. Great job! But the real work is just starting. Getting that wood floor bone dry is super important. If you don’t dry it out completely, you’re just asking for trouble down the road, like mold or boards that keep warping. This is where you really need to be patient.
Employ Dehumidifiers For Moisture Removal
Fans are good for moving air around, but to really pull moisture out of the wood and the air, you need a dehumidifier. Think of it as a moisture magnet. You’ll want to place it in the room with the damaged floor and let it run. For serious water issues, you might even need a commercial-grade unit, which you can often rent. The goal is to get the humidity level in the room pretty low, ideally below 40 percent. Keep it running until your moisture meter shows the wood and the subfloor are back to normal levels. Don’t just guess – use that meter!
Allow Adequate Drying Time
This is the part where you really have to resist the urge to rush. Drying out wood flooring properly can take a while. We’re talking weeks, not days, especially if the water got deep into the boards or under the floor. You need to let the wood and the subfloor dry out completely. A moisture meter is your best friend here. You want to see readings that match the normal moisture content for your area, usually between 6% and 9%. Testing the subfloor is just as important; it should be within 2-4% of the hardwood’s moisture level. If the subfloor is still wet, it’ll just keep feeding moisture to your floor, undoing all your hard work. Remember, a floor can look dry on top but still be soaked underneath.
Inspect For And Address Mold Growth
Once you think everything is dry, it’s time for a thorough inspection. Look closely at the surface of the wood, and if you can, check underneath the boards too. Water damage creates a perfect environment for mold, and you don’t want that growing in your home. If you find any signs of mold, you’ll need to deal with it. For small spots, a mixture of white vinegar and water can often do the trick. Just wipe it down gently and make sure to dry the area completely afterward. If the mold problem is extensive, or if you’re just not comfortable tackling it yourself, it’s best to call in a professional mold remediation service. They have the right tools and knowledge to handle it safely and effectively, preventing future issues with moisture control systems.
Don’t try to speed up drying with high heat or strong, direct fans. While it might seem like a good idea, it can actually cause more problems, like uneven drying and further damage to the wood. Stick to consistent airflow and dehumidification. Household fans or space heaters aren’t the answer here.
Repairing Minor Water Stains And Imperfections
Okay, so your floor has seen better days after a little water incident. Don’t panic just yet! Sometimes, the damage isn’t as bad as it looks, and you can totally fix those minor stains and little imperfections yourself. It’s all about knowing what to look for and using the right approach.
Clean Surface Stains With Gentle Solutions
First things first, let’s tackle those surface stains. If you’ve got light discoloration, it might just be dirt or residue sitting on top of the finish. You can usually get rid of these with a simple cleaning solution. Mix a bit of pH-neutral cleaner with some warm water. Grab a soft microfiber cloth or a mop, dampen it (remember, not soaking wet!), and gently wipe down the stained areas. After cleaning, dry the spot right away with a clean towel. It’s important to keep things from getting too wet, as that can cause more problems.
Address White Stains Trapped In Finish
See those cloudy or hazy white spots? That usually means water got trapped right in the wood’s finish. It’s not as bad as it sounds. You can try dabbing a soft cloth with mineral spirits or denatured alcohol and gently rubbing the stain. Keep at it until it starts to fade. Once it looks better, wipe it with a damp cloth and dry it off quickly. If that doesn’t quite do the trick, a little bit of baking soda on a damp cloth, rubbed very gently, might help. Just be careful not to scrub too hard, or you could scratch the finish.
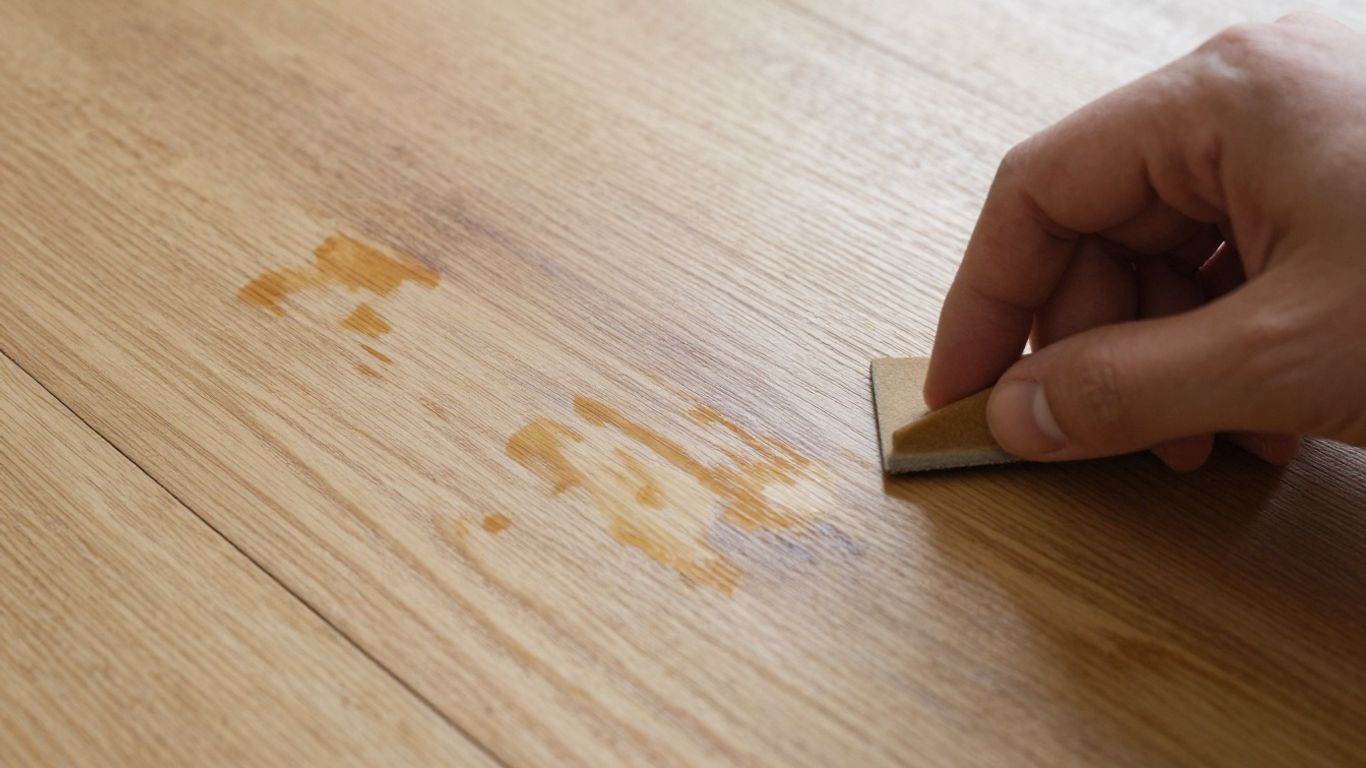
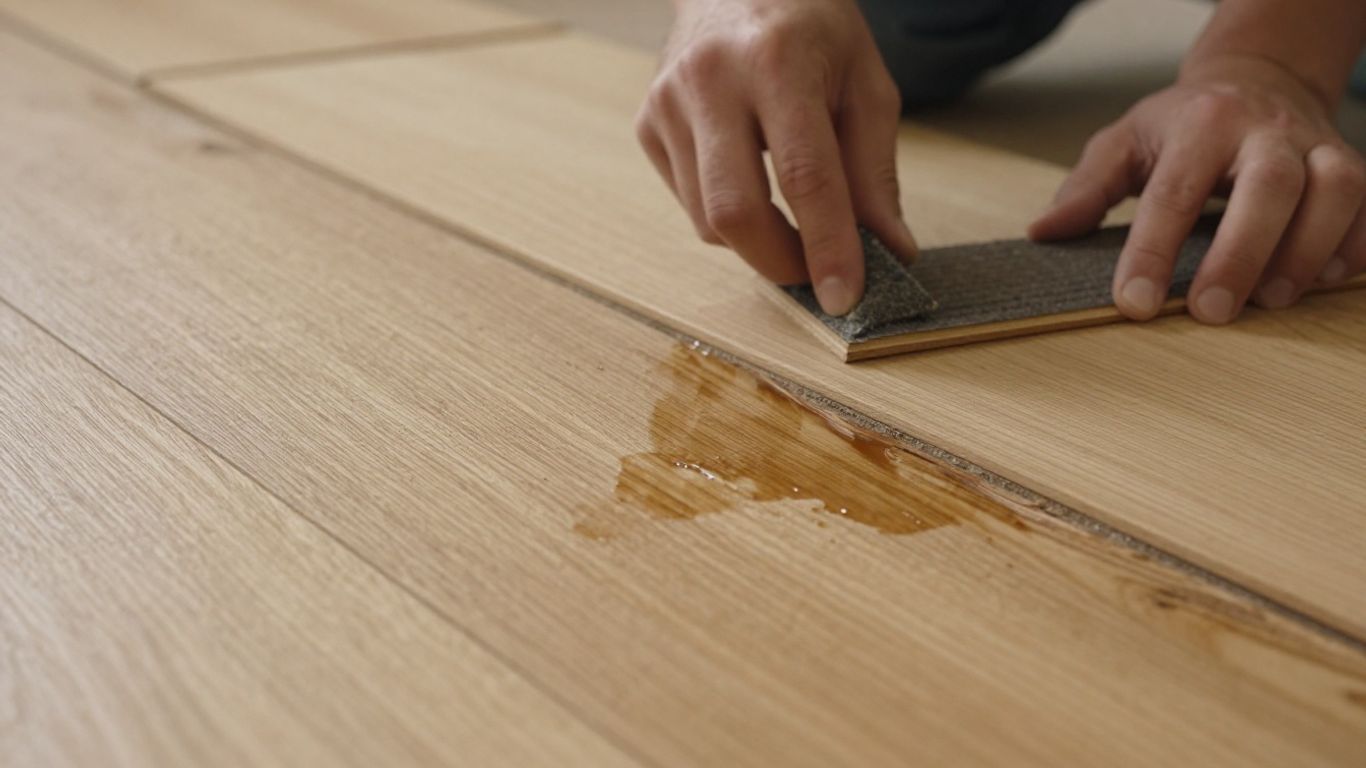
Treat Dark Stains Penetrating The Wood
Darker stains are a bit more serious because they mean the water actually soaked into the wood itself. This is trickier, but often fixable. You’ll want to start by lightly sanding the stained spot. Use a fine-grit sandpaper, like 220-grit. After sanding, wipe away all the dust with a damp cloth. Then, you can try applying a wood stain that matches your floor as closely as possible. After the stain dries, seal it with a coat of polyurethane. It’s always a good idea to test your stain and finish in a less visible area first, just to make sure it looks right. If the stain is really deep, you might be looking at replacing the affected board, but for minor ones, this method can work wonders.
Dealing with water damage on your hardwood floors can feel overwhelming, but for minor issues like surface stains or slight discoloration, a careful and patient approach can often restore their appearance without needing major repairs. Always remember to test any cleaning or repair solution in an inconspicuous spot first to avoid making the problem worse.
Sometimes, even slight warping can occur. If your floorboards look a little cupped after drying, you might be able to flatten them out by sanding down any raised edges with fine sandpaper. You could also try placing some heavy objects on the warped area for a day or two to help press them down. For a smoother look, a wood floor polish might help disguise minor imperfections. If the warping is significant, though, you might need to consider replacing damaged boards or calling in a professional.
Addressing More Significant Water Damage
Okay, so you’ve dried everything out, and thankfully, there’s no mold. But what if the water did more than just leave a stain? Sometimes, especially with longer exposure or deeper leaks, you’re going to see more serious issues like warped boards or even damage to the stuff underneath your pretty wood floor.
Repair Slightly Warped Floorboards
Sometimes, after drying, your floorboards might still have a bit of a wave to them. This is usually called ‘cupping,’ where the edges of the board are higher than the center. If it’s not too bad, and the wood feels solid, you might be able to fix it. The key here is patience. Allowing the wood to fully acclimate to normal humidity levels is the first and most important step. If the cupping is minor, sometimes it will flatten out on its own over time. If it doesn’t, you might need to try a process called ‘flattening’ which involves carefully sanding down the raised edges. This is a delicate job, and if you’re not comfortable with it, it might be time to call in a pro.
Replace Severely Damaged Boards
If some boards are really warped, soft, or have started to rot, they’ve got to go. You can’t just sand away rot, unfortunately. Replacing individual boards is totally doable, but it takes some care. You’ll need to carefully cut out the damaged board(s) without messing up the ones next to them. Then, you’ll need to find replacement boards that match the size, thickness, and ideally, the wood species and grain of your existing floor. Getting a perfect match can be tricky, especially on older floors. Once the new boards are in, you’ll need to sand them down to be flush with the rest of the floor. This is where things can get a bit tricky if you’re trying to match the existing finish. Sometimes, you might need to replace a whole section if the damage is widespread. For insurance claims, understanding the different repair tiers is important, as they often categorize this type of work based on water category and duration.
Address Subfloor Moisture Concerns
This is the part that really worries people, and for good reason. The subfloor is what your hardwood is attached to, and if it gets wet and stays wet, it can cause all sorts of problems. Swollen, delaminated, or moldy subflooring needs attention before you even think about fixing the wood floor on top. If you suspect subfloor issues, you might need to pull up a section of the hardwood to get a good look. If the subfloor is damaged, it will likely need to be repaired or replaced. This is a bigger job and often requires professional help. Ignoring subfloor moisture is a recipe for disaster, as it can lead to mold growth and structural issues down the line. If you find mold, it’s best to get it handled by professionals, as mold removal can be complex.
Restoring The Wood Floor’s Appearance
Okay, so you’ve dealt with the water, dried everything out, and maybe even replaced a few boards. Now it’s time to make that floor look like it did before the whole ordeal. This is where things get a bit more hands-on, but the results can be really satisfying.
Sand and Refinish for Widespread Damage
If the water damage is spread out, or if you’ve had to replace several boards, trying to spot-repair the finish can look… well, patchy. It’s often better to go for a full refinish. This means sanding down the entire floor to remove the old finish and any lingering water stains or discoloration. You’ll want to start with a coarser grit sandpaper (around 36-40) to get rid of the old stuff and level things out, then move to a medium grit (60-80) to smooth out those deeper scratches. Finally, a fine grit (100-120) will give you that nice, smooth surface ready for new protection.
- Start with coarse grit: Removes old finish and evens out the surface.
- Move to medium grit: Smooths out scratches from the first pass.
- Finish with fine grit: Creates a smooth canvas for staining and sealing.
Remember, sanding removes a layer of wood. If your floor is antique and has been refinished many times, be careful not to sand too deep, or you could damage the floor’s integrity.
Apply Matching Stain and Protective Finish
This is the part where you bring the color back. If you’re just refinishing, you’ll need to pick a stain. Matching an existing color can be tricky. New wood takes stain differently than old wood, and a fresh finish might look shinier. It’s a good idea to test stain colors on scrap pieces of wood first. Sometimes, mixing two stain colors gives you a better match than a single store-bought one. Once the stain is dry (give it at least 24 hours), it’s time for the protective finish. Polyurethane is a popular choice because it’s tough. You can go with oil-based, which gives a warm tone and deepens over time, or water-based, which dries faster and keeps the wood color more natural. Apply thin coats, usually two or three, sanding lightly between each coat for the best adhesion. Check out different finish options to see what works best for your situation.
Polish and Buff to Restore Shine
After the final coat of finish has cured – and this can take a few days, so be patient! – it’s time for the finishing touches. You’ll want to polish and buff the floor to bring back that beautiful shine. A soft cloth or a buffer with a polishing pad can work wonders here. This step not only makes the floor look great but also helps to seal in the finish and protect it from everyday wear and tear. Regular cleaning with a microfiber mop and a pH-neutral cleaner will help keep it looking good for years to come. And don’t forget to put felt pads on all your furniture legs; dragging even one heavy chair can undo all your hard work.
Bringing Your Floors Back to Life
So, there you have it. Dealing with water damage on your hardwood floors can seem like a big headache, but as we’ve seen, it’s often something you can tackle yourself. Remember, the key is to act fast, get that water stopped and dried out properly, and then figure out the best way to fix things up. Whether it’s just a quick clean for minor spots or a bit more work for bigger issues, taking these steps can really save your floors. And hey, if things look too complicated, don’t be afraid to call in someone who knows their stuff. A little effort now can keep your floors looking great for years to come.
Frequently Asked Questions
How quickly do I need to deal with water on my wood floors?
You should act as fast as possible! The longer water sits on wood, the more damage it can cause. Getting rid of standing water and starting the drying process right away is super important to save your floors.
What are the first signs of water damage on wood floors?
Look for things like dark or white spots where water sat, boards that look bent or puffy, or even a musty smell that could mean mold is starting. Sometimes, you can see boards lifting up from the floor.
Can I fix water stains myself?
For light white stains trapped in the shiny top layer, you might be able to buff them out with things like mineral spirits or even a paste of baking soda. Darker stains that soaked into the wood are tougher and might need light sanding and restaining.
How long does it take for wood floors to dry completely?
Drying can take a while, often from two weeks to a month or even longer, especially if the water got under the boards. You can’t just look at it; using a moisture meter is the best way to know for sure if it’s dry enough.
When should I call a professional for water-damaged wood floors?
If you see signs of mold, if boards are badly warped or buckling, or if the water damage is widespread, it’s best to call in the pros. They have special tools and know-how to handle bigger problems and make sure everything is dried and repaired correctly.
How can I prevent water damage to my wood floors in the future?
Use doormats at entrances to catch water and dirt. Check regularly for leaky pipes or appliances. Try to keep your home’s humidity at a good level, not too high or too low. And clean up spills right away!