Here are the main things to remember about checking for mold in your house:
Key Takeaways
- Start with a visual check and look in damp, dark places where mold likes to grow.
- DIY mold test kits can be useful for visible mold or a quick air check, but they have limits.
- A musty smell without visible mold often means you need air sampling to find hidden growth.
- For serious concerns, health symptoms, or real estate deals, a professional inspection is best.
- Always fix the moisture problem causing the mold, or it will just return.
Understanding Your Mold Detection Options
So, you think you might have mold? It’s a common worry, and figuring out how to check for it can be confusing. You’ve got a couple of main paths you can take: the DIY route with a test kit, or bringing in the pros for a full inspection. Each has its place, and knowing which one fits your situation is key.
DIY Mold Test Kit vs Professional Mold Inspection
DIY mold test kits are generally pretty affordable, usually costing between $10 and $50 for the kit itself, plus a lab fee if you send samples out. They can be useful for getting a basic idea of what’s going on. For example, if you see a patch of mold and want to know what kind it is, a surface swab kit is a straightforward way to find out. You can grab a Mold Armor Do It Yourself Mold Test Kit at most hardware stores.
On the other hand, a professional mold inspection is a bigger investment, typically ranging from $300 to $800. But you get a lot more for your money. Professionals use calibrated equipment, know exactly where to sample based on moisture readings and building knowledge, and always include an outdoor baseline sample for comparison. They also provide a detailed report with findings and recommendations, which is pretty important if you’re dealing with health concerns or a real estate transaction.
Here’s a quick look at how they stack up:
| Factor | DIY Mold Test Kit | Professional Mold Inspection |
|---|---|---|
| Cost | $10-$50 kit + lab fees | $300-$800 (includes sampling + report) |
| Accuracy | Low to moderate | High |
| Turnaround Time | 3-10 days (after mailing) | 2-5 days |
| Moisture Assessment | Not included | Included |
| Written Report | Basic lab report only | Detailed findings + recommendations |
When to Skip DIY and Call a Professional
While DIY kits can be tempting, there are definitely times when you should just call in an expert. If you’re experiencing ongoing health issues that you suspect are related to mold, like constant sneezing or breathing trouble, a professional assessment is the way to go. They can provide a more thorough evaluation and documentation that might be needed by a doctor. Also, if you’ve had mold remediation done, you’ll want a professional to do the clearance testing to make sure the job was done right. Trying to cut corners here can lead to bigger problems down the road.
If you can see mold and it covers less than 10 square feet, the EPA says you can probably just clean it up yourself without testing. Testing is really for when you can’t find the source, have health symptoms, or need to verify cleanup.
Choosing the Right Mold Testing Kit for Your Situation
So, what kind of test is best for you? It really depends on what you’re trying to find out.
- Visible Mold, Want to Know the Species: A surface swab or tape lift kit is usually the most cost-effective option here. You send the sample to a lab, and they’ll tell you what kind of mold you’re dealing with.
- Musty Smell, No Visible Mold: This is where air sampling comes in handy. You’ll want a spore trap air sampling kit, ideally with at least two cassettes (one inside, one outside). This helps detect hidden mold by measuring airborne spores. Investigating these odors is often the first step.
- Health Symptoms, Need Comprehensive Assessment: For a more in-depth look, especially if you have health concerns, consider an ERMI or HERTSMI-2 dust test. These DNA-based tests give a more detailed species analysis and are often used by environmental health professionals.
- Post-Remediation Verification: This is a big one. Always hire a professional for this. You need independent verification that the mold has been successfully removed.
Common Scenarios for Mold Testing
So, you’re thinking about testing for mold. That’s smart. But when exactly should you pull the trigger on a test? It’s not always a clear-cut decision, and knowing the right time can save you money and a lot of hassle. Let’s break down the situations where testing really makes sense.
Visible Mold, Want to Know the Species
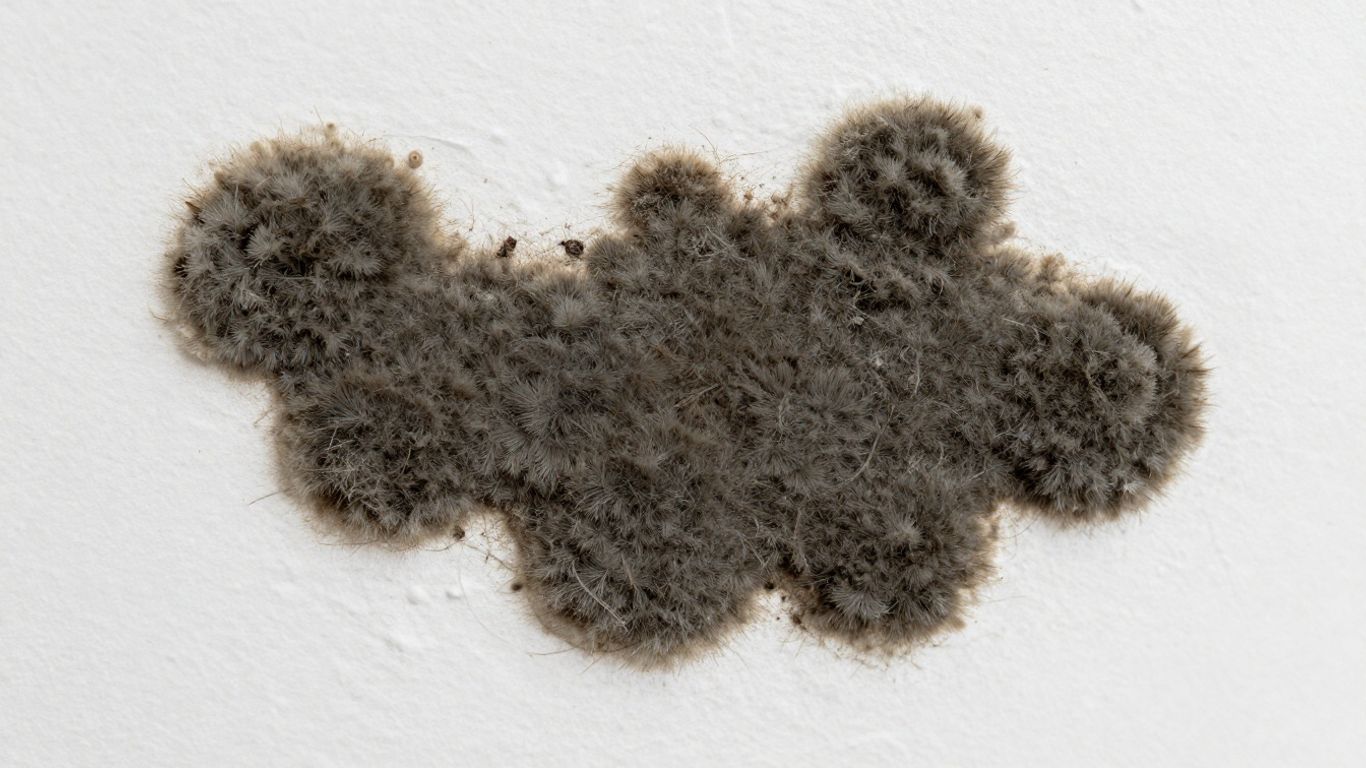
Okay, you’ve spotted some fuzzy stuff on the wall or maybe a discolored patch in the bathroom. It’s definitely mold, but what kind is it? Is it the common, relatively harmless kind, or something more concerning like Stachybotrys chartarum (you know, the ‘black mold’)? If you’re seeing mold and want to get specific, a surface swab or tape lift kit is your best bet. You just collect a sample of the visible growth and send it off to an accredited lab. They can tell you the genus and sometimes even the species. This information is super helpful for figuring out how serious the problem is and what needs to be done to fix it. Knowing the species can help determine the urgency of remediation.
Musty Smell, No Visible Mold
This is a classic. You walk into a room, and there’s that unmistakable damp, earthy smell, but you look high and low, and you just can’t see any mold. Where is it coming from? It could be hiding behind walls, under carpets, or in your HVAC system. In this case, air sampling is the way to go. You’ll want a kit that uses spore traps, and ideally, you’ll want at least two: one for inside and one for outside. The outdoor sample acts as a baseline, so you know what normal spore levels look like in your area. If the indoor sample shows way more spores than the outdoor one, especially of certain types, it’s a strong indicator of hidden mold growth. This kind of testing can help pinpoint suspected hidden mold.
Health Symptoms, Need Comprehensive Assessment
Are you or someone in your household experiencing weird health issues like constant sneezing, headaches, or breathing problems that seem to get worse when you’re at home? If these symptoms improve when you leave the house, mold could be the culprit. When health is on the line, you need a more thorough look. For this, tests like ERMI (Environmental Relative Moldiness Index) or HERTSMI-2 are often recommended. These tests analyze dust samples and can identify a wide range of mold species, giving you a detailed picture of the mold exposure in your home. Doctors sometimes request these specific tests to help connect your symptoms to your environment.
Post-Remediation Verification
So, you’ve had mold professionally removed. Great! But how do you know for sure it’s all gone and the problem is solved? This is where post-remediation verification testing comes in. It’s basically a follow-up inspection to make sure the cleanup was effective. You absolutely want to use a professional for this, and ideally, someone who wasn’t involved in the original cleanup. They’ll conduct air sampling, often comparing indoor levels to outdoor levels again, to confirm that spore counts are back to normal. This step is really important for peace of mind and to prevent the mold from coming back. It’s a key part of addressing water damage properly.
When you’re dealing with potential mold issues, especially those affecting your health or property value, it’s easy to get overwhelmed. Remember that testing is a tool, and its usefulness depends heavily on the situation. Don’t just test for the sake of testing; understand what you’re trying to find out and choose the method that best answers your questions.
Key Steps in How to Detect Mold in Home
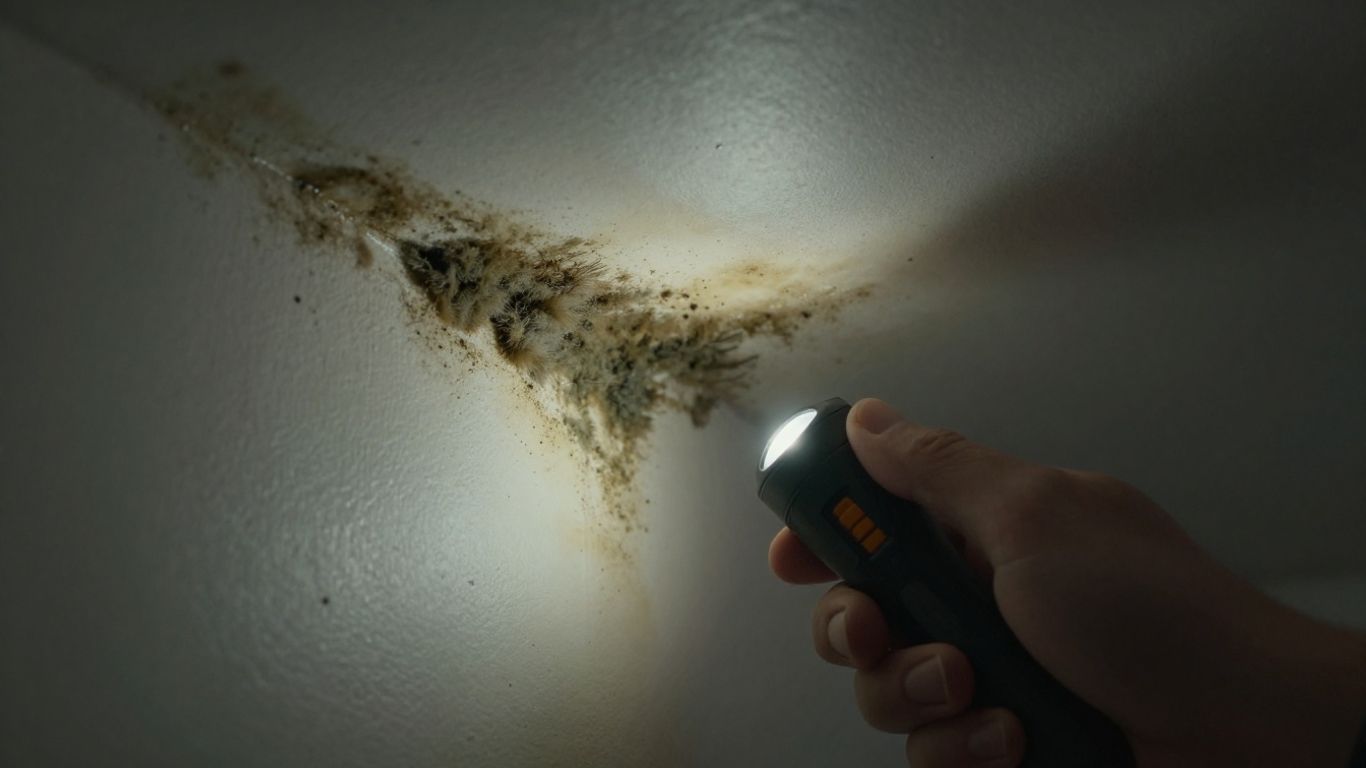
Alright, so you think you might have a mold situation brewing. Don’t panic! The first thing to do is a good old-fashioned visual check. Look for those fuzzy patches, discoloration on walls or ceilings, or even just weird stains that weren’t there before. Sometimes, mold can look like dirt or soot, so keep your eyes peeled.
Identifying High-Risk Locations
Mold really loves damp, dark places. Think about areas where water might hang around. This includes:
- Bathrooms: Especially around showers, tubs, and under sinks.
- Kitchens: Under the sink, around the dishwasher, and near the refrigerator’s ice maker line.
- Basements and Crawl Spaces: These are prime spots for moisture buildup.
- Attics: Leaky roofs can create hidden mold problems.
- Around Windows: Condensation can lead to mold growth on frames and sills.
- Areas with Past Water Damage: Even if it looks dry now, mold might be lurking.
The most important thing is to find the source of the moisture, because without water, mold can’t grow. If you’ve had any kind of water damage, like a leaky pipe or a flood, you’ll want to pay extra attention to those spots. It’s like mold’s favorite hangout. You can find some helpful tips on dealing with water damage and preventing mold here.
Assessing Moisture and Ventilation
Beyond just looking, you need to think about the environment. Is there a persistent musty smell, even if you can’t see anything? That’s a big clue. Check your ventilation – are exhaust fans working in bathrooms and kitchens? Is there good airflow in the basement or attic? Poor ventilation traps moisture, which is mold’s best friend. You might also notice peeling paint or wallpaper, or warped surfaces; these are often signs that moisture is present and causing damage. If you’re experiencing allergy-like symptoms that seem to get worse indoors, that could also be a sign that mold is present, even if it’s not visible. Keep an eye out for common signs of mold after water damage as well.
Common Mistakes to Avoid When Testing for Mold
So, you’ve decided to test for mold in your home. That’s a smart move, especially if you’re dealing with a musty smell or health concerns. But before you grab that DIY kit, let’s talk about some common pitfalls that can lead to confusing or just plain wrong results. Nobody wants to waste money or get a false sense of security, right?
Misinterpreting Settle Plate Tests
These are the petri dishes you might see in some kits. You just leave them open for a day or two and then seal them up. The problem is, mold spores are everywhere, all the time. So, these plates will almost always grow something, even in a perfectly healthy home. A positive result from a settle plate alone doesn’t mean you have a mold problem. It just means mold spores landed on it, which is normal. They can’t tell you if the amount is high or if it’s a type that’s actually harmful.
Sampling Without an Outdoor Baseline
Imagine you get an air sample result that says there are 5,000 mold spores per cubic meter of air. Is that high? Is it normal? You have no way of knowing without comparing it to the outside air. Spore counts fluctuate wildly depending on the season, weather, and local environment. Always collect an outdoor sample at the same time you collect your indoor samples. This gives you a reference point to see if your indoor levels are actually elevated compared to what’s naturally present outdoors. Without this, the indoor number is pretty much meaningless.
Opening Windows Before Sampling
This one’s a biggie. If you’re planning to do an air test, make sure all your windows and exterior doors are shut for at least 12 to 24 hours beforehand. Opening them up right before you sample is like inviting a flood of outdoor mold spores into your house. It will skew your results, potentially masking any indoor mold issues you might have. You want to test the air quality inside your home, not the air that just blew in from outside.
Sampling Only One Room
Mold can be sneaky. It might be growing in a damp basement, a leaky attic, or behind a wall, and the air in your main living area might seem fine. If you only test one room, you could completely miss the source of the problem. It’s often recommended to test multiple areas, especially places known for moisture issues. If you’re unsure, a professional inspection can help identify the best places to sample. Remember, mold can travel through your HVAC system, so a problem in one area can affect the whole house.
Ignoring Moisture in Favor of Mold Testing
This is perhaps the most critical mistake. Mold needs moisture to grow. Testing for mold tells you if mold is present and how much, but it doesn’t tell you why it’s there. If you find mold and just test it without addressing the underlying water problem, the mold will just come back. You need to find and fix the source of the moisture first. Think of mold as a symptom; the moisture is the illness. You can’t cure the illness by just looking at the symptom. Using a moisture meter to find active water leaks is a good first step before you even think about testing for mold. Fixing the water issue is always the priority, and it’s often the most important part of preventing future mold growth.
Testing for mold can be a useful tool, but it’s not a magic bullet. It’s important to understand what the tests can and cannot tell you, and to use them in conjunction with other methods, like visual inspections and moisture detection. Don’t let test results distract you from addressing the root cause of mold growth: water.
Professional Mold Inspection Protocols
When you suspect mold, especially if it’s widespread or causing health issues, calling in the pros is often the smartest move. A professional mold inspection isn’t just about collecting samples; it’s a systematic process designed to find the source, assess the extent of the problem, and figure out what needs to be done. They use specialized tools and knowledge that go way beyond what a typical DIY kit can offer.
Visual Assessment and Moisture Mapping
First off, a certified inspector will do a thorough visual check of your entire property. They’re looking for any signs of water damage, discoloration on walls or ceilings, and, of course, visible mold growth. But they don’t stop there. They’ll use tools like moisture meters and sometimes even thermal imaging cameras to find hidden dampness behind walls, under floors, or in attics. This moisture mapping is key because mold needs water to grow, so finding the water source is critical to solving the problem permanently. They’ll also check areas that are often overlooked, like:
- Around windows and doors
- Under sinks and behind appliances
- In basements and crawl spaces
- Attics and HVAC systems
Understanding the building’s structure and how water moves within it is a big part of a professional’s job. They’re not just looking at the surface; they’re thinking about the whole system.
Strategic Air and Surface Sampling
If visual inspection and moisture mapping suggest a problem, the next step is sampling. Professionals use calibrated air pumps to draw a specific amount of air through a collection device, like a spore trap cassette. They’ll take samples both inside and outside your home. The outdoor sample acts as a baseline, helping to determine if indoor spore levels are unusually high compared to the environment outside. Surface samples, often collected with swabs or tape lifts, are used to identify mold on specific materials or in areas where mold is visible. The placement of these samples is strategic, based on the inspector’s findings during the visual assessment and moisture mapping. This targeted approach is what sets professional testing apart from just grabbing a DIY kit. For more information on professional services, you can look into Trademark Inspection Services.
Lab Analysis and Documentation
Once samples are collected, they are sent to an accredited laboratory for analysis. Professionals maintain a strict chain of custody for these samples, which is important for legal or insurance purposes. The lab will identify the types of mold spores present and quantify their amounts. You’ll receive a detailed report that includes:
- Findings from the visual inspection and moisture assessment.
- Results from air and surface sampling, including spore counts and types.
- An interpretation of the results in the context of your home and health concerns.
- Recommendations for remediation if mold is found to be an issue.
This comprehensive documentation is what gives you a clear picture of the mold situation and a solid plan for addressing it. Professionals are trained to interpret these results accurately, considering factors like spore types and overall building health. If you’re looking for expert mold inspection services, this level of detail is what you should expect.
Interpreting Your Mold Test Results
So, you’ve sent off your samples, and now you’ve got a report back. What does it all mean? It can feel like deciphering a secret code, but let’s break it down.
Understanding Spore Trap Results
Spore trap results usually list different types of mold spores found in the air and how many were collected per cubic meter of air. It’s important to remember that there aren’t really any hard-and-fast rules for what’s ‘acceptable’ indoors, but professionals use a few key ideas to figure things out.
- Compare Indoor to Outdoor: This is a big one. Your indoor spore counts should generally be similar to, or lower than, what’s found outside. If your indoor levels are way higher than the outdoor baseline, it strongly suggests mold is growing somewhere inside your home.
- Look at the Species: It’s not just about the total number of spores. The types of mold matter too. If your outdoor air is mostly one type of mold, like Cladosporium (which is super common), but your indoor air has a lot of different types, especially ones like Aspergillus or Penicillium, that’s a sign of an indoor problem.
- Watch Out for Red Flags: Some mold species are more concerning than others. Molds like Stachybotrys (often called "black mold"), Chaetomium, and Memnoniella are indicators of long-term water damage. Even if you don’t see a huge number of these, their presence means there’s likely a hidden moisture issue that needs attention.
General Spore Count Reference Ranges
While not official standards, these general ranges can help you get a feel for your results when compared to your outdoor sample:
| Total Indoor Spore Count (spores/m³) | General Interpretation |
|---|---|
| Below outdoor level | Normal. No indoor amplification detected. |
| Equal to outdoor level | Likely normal. Review species distribution. |
| 1.5x to 3x outdoor level | Elevated. Possible indoor source. Further investigation recommended. |
| 3x+ outdoor level | Significantly elevated. Active indoor mold growth likely. |
Remember, these numbers are just a starting point. They need to be looked at alongside what you see in your home and how people are feeling. If the results are confusing, it’s often worth getting a professional opinion to review them.
Understanding ERMI and HERTSMI-2 Scores
ERMI (Environmental Relative Moldiness Index) and HERTSMI-2 are different types of tests that look at mold DNA in dust samples. They give you a single score instead of spore counts.
- ERMI: This score compares your home’s mold levels to a national database. A score below -1 is considered low (better than 75% of homes), -1 to 5 is typical, 5 to 10 is elevated, and above 10 suggests you should look for hidden water damage.
- HERTSMI-2: This score is based on research related to health symptoms. Scores below 11 are generally seen as safe. Scores between 11 and 15 are borderline, and anything above 15 might mean the building isn’t suitable for people sensitive to mold. If you’re trying to figure out if your home is making you sick, talking to a professional mold inspector about these scores is a good idea, as they can help you understand the potential health implications. Finding affordable mold testing near you can be the first step in getting these answers.
Conclusion
Figuring out if you have mold in your home doesn’t have to be a mystery. By understanding your options, knowing where to look, and avoiding common pitfalls, you can get a clear picture of your home’s air quality. Whether you choose a DIY kit for a quick check or call in the pros for a deep dive, taking action to detect and address mold is a smart move for a healthier living space. Remember, finding and fixing moisture sources is key to preventing mold from coming back.
Frequently Asked Questions
Are home mold test kits reliable?
Some DIY kits are okay for a basic idea, especially if you see mold. But they aren’t always super accurate and don’t tell you the whole story. Think of them as a starting point, not the final answer. For serious worries, it’s better to get a pro involved.
How much does it cost to test for mold?
Testing for mold can cost different amounts. Simple DIY kits might be around $10 to $50, plus lab fees if you send samples. A full inspection by a professional usually costs more, maybe $300 to $800, but it gives you a much more complete picture and professional advice.
What’s the best way to test for mold myself?
If you want to test yourself, using a surface swab for visible mold or an air sampling cassette (like a spore trap) are common methods. Just be sure to follow the instructions exactly and consider sending samples to a lab for better results. Remember to also check outside for comparison.
Can I just clean up mold myself?
For small spots of mold, less than about 10 square feet (like a 3×3 foot area), you can usually clean it up yourself with soap and water. Make sure to wear gloves and a mask. If the mold is a big area, keeps coming back, or you have health problems, it’s time to call a professional.
How long does mold testing usually take?
If you use a DIY kit and send it to a lab, it might take a week or two to get results back, including shipping time. Professionals usually get results faster, often within a few days to a week, because they use quicker lab services and know the process.
Do I need mold testing after a water leak?
Yes, it’s a good idea. Even after water damage is cleaned up, mold can start growing if things didn’t dry out properly. Testing can help make sure there isn’t hidden mold that could cause problems later, especially if you notice any strange smells.