Is your home plagued by musty odors, high humidity, or unexplained health issues? The culprit might be lurking beneath your floors. Crawl space mold is a common but serious problem that affects indoor air quality and can compromise your home’s structural integrity. With up to 50% of your home’s air coming from the crawl space, addressing mold at its source through proper encapsulation is essential for creating a healthy living environment.
Crawl space mold encapsulation is a specialized process that seals your crawl space with a vapor barrier system, preventing moisture intrusion and creating an environment where mold cannot thrive. This comprehensive guide will walk you through the encapsulation process, highlight critical dos and don’ts, and explain why professional assessment might be your best investment for long-term protection.
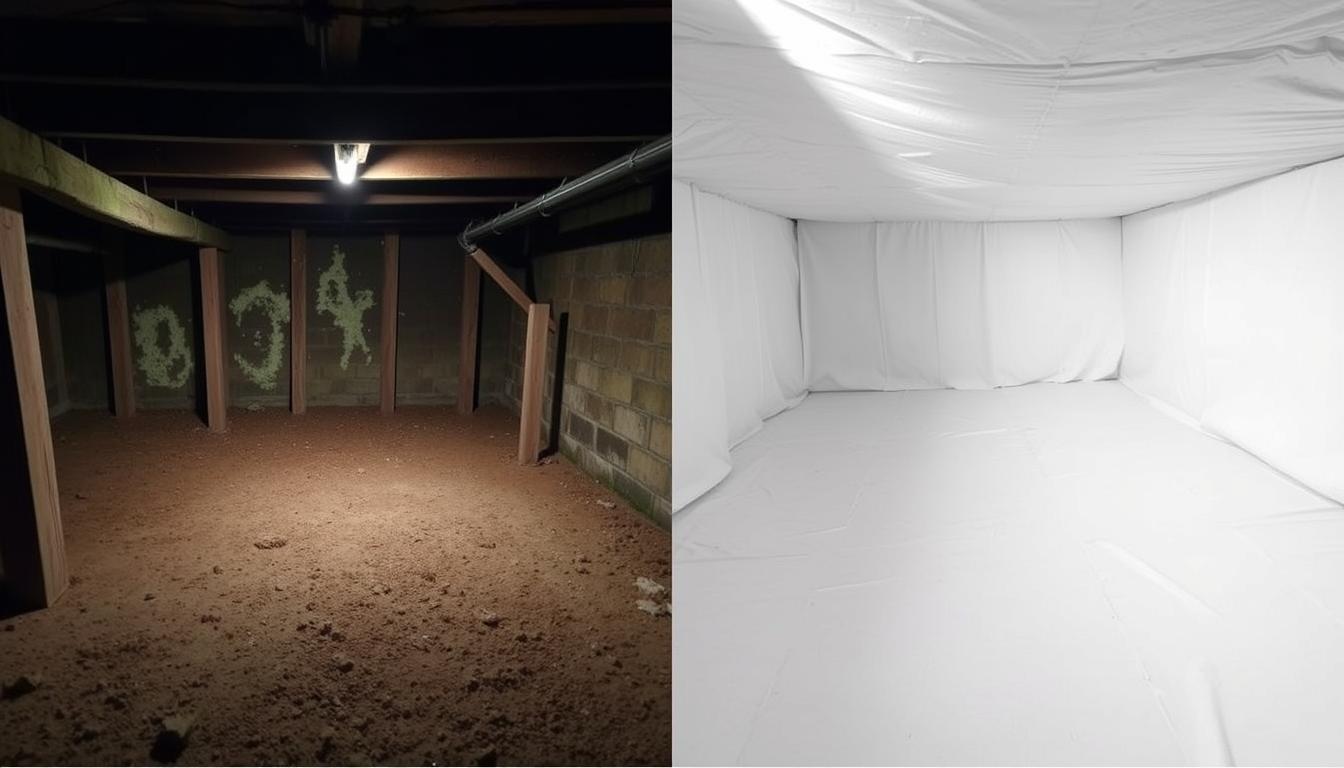
Understanding the Dangers of Crawl Space Mold
Crawl spaces are particularly vulnerable to mold growth due to their location and design. Being close to the ground, they naturally attract moisture through soil contact, condensation, and water intrusion. Without proper barriers, this moisture creates ideal conditions for mold to flourish.
The health implications of crawl space mold extend beyond the space itself. Mold spores travel upward through your home via the “stack effect,” where warm air rises and pulls contaminants from below into your living spaces. This can trigger allergies, respiratory issues, and other health problems for your family.
Beyond health concerns, mold in your crawl space can cause significant structural damage. As mold feeds on organic materials like wood joists and subflooring, it weakens these critical structural components, potentially leading to costly repairs. Early intervention through proper encapsulation is your best defense against these serious consequences.
Signs You Need Crawl Space Mold Encapsulation

Visual Indicators
- Visible mold growth on wood surfaces
- Standing water or damp spots
- Water stains on foundation walls
- Deteriorating insulation
- Rotting or decaying wood structures

Indoor Environment Symptoms
- Persistent musty odors throughout the home
- Unusually high indoor humidity levels (above 60%)
- Increased allergy symptoms or respiratory issues
- Uneven temperatures between rooms
- Rising energy bills despite normal usage
Important: If you notice multiple signs from the lists above, it’s recommended to have your crawl space professionally assessed. Early intervention can prevent more extensive damage and health issues.
The Crawl Space Mold Encapsulation Process: Step-by-Step
Proper crawl space encapsulation follows a systematic approach to ensure complete moisture control and mold prevention. Here’s a comprehensive breakdown of the professional process:

1. Inspection and Assessment
The first critical step is a thorough inspection of your crawl space. Professionals evaluate moisture sources, existing mold, structural issues, and ventilation. This assessment determines the specific approach needed for your unique situation and helps identify any repairs required before encapsulation begins.
2. Crawl Space Cleanup and Preparation
Before encapsulation can begin, the crawl space must be thoroughly cleaned. This includes:
- Removing debris, old insulation, and any standing water
- Professional mold remediation if significant growth is present
- Addressing any wood rot or structural damage
- Repairing plumbing leaks or foundation cracks

3. Vapor Barrier Installation
The core of crawl space encapsulation is installing a high-quality vapor barrier. This specialized plastic sheeting creates a complete moisture barrier between the earth and your home. Professional installation includes:
- Using heavy-duty polyethylene sheeting (minimum 10-20 mil thickness)
- Covering the entire floor surface and extending up foundation walls
- Sealing all seams with specialized tape for a complete moisture barrier
- Securing the barrier to walls with mechanical fasteners
4. Foundation Wall and Crawl Space Insulation
Proper insulation is crucial for temperature control and moisture management:
- Installing rigid foam board insulation on foundation walls
- Avoiding fiberglass insulation which can absorb moisture and promote mold
- Sealing gaps around penetrations (pipes, wires, vents)

5. Moisture Control Systems
Encapsulation alone isn’t always enough. Additional moisture control measures often include:
- Installing a dedicated crawl space dehumidifier
- Adding a sump pump system if water intrusion is an issue
- Implementing proper drainage solutions
- Sealing all vents to prevent outside humid air from entering
6. Final Inspection and Monitoring
The final step ensures everything is properly installed and functioning:
- Verifying all seams are properly sealed
- Confirming dehumidifier and drainage systems are operational
- Installing humidity monitors for ongoing assessment
- Providing maintenance recommendations
Not Sure Where to Start?
Our experts can assess your crawl space and recommend the right encapsulation solution for your specific mold and moisture issues.
Crawl Space Mold Encapsulation: Essential Dos and Don’ts
Successful crawl space encapsulation requires following proven best practices while avoiding common mistakes. Here’s what you need to know:
DO
- Address existing mold first – Proper remediation before encapsulation is essential
- Use high-quality materials – Invest in thick vapor barriers (10-20 mil) designed specifically for crawl spaces
- Seal all seams properly – Overlapping seams by 6-12 inches and using specialized tape ensures a complete moisture barrier
- Install a dehumidifier – Maintaining humidity below 55% prevents mold growth
- Seal foundation vents – Contrary to older practices, modern encapsulation requires sealing outside air sources
- Extend vapor barrier up walls – Cover at least 6-8 inches up foundation walls for complete protection
- Install proper drainage – Address water intrusion issues with appropriate drainage solutions
DON’T
- Use thin plastic sheeting – Lightweight materials tear easily and don’t provide adequate protection
- Ignore existing water issues – Encapsulation won’t solve active leaks or drainage problems
- Use fiberglass insulation – It absorbs moisture and becomes a breeding ground for mold
- Skip professional assessment – DIY approaches often miss critical issues that professionals can identify
- Leave vents open – Open vents introduce humid air, defeating the purpose of encapsulation
- Neglect proper sealing techniques – Improper sealing creates moisture entry points
- Forget ongoing monitoring – Crawl spaces need regular inspection to ensure systems remain effective

“The most common mistake homeowners make is attempting DIY encapsulation without addressing underlying moisture issues first. Proper crawl space mold encapsulation requires a systematic approach that begins with thorough remediation and moisture source identification.”
Benefits of Professional Crawl Space Mold Encapsulation

Improved Indoor Air Quality
Professional encapsulation creates a complete barrier against mold spores and moisture, preventing them from entering your living spaces. This leads to cleaner air throughout your home and can significantly reduce allergy and asthma symptoms.
Structural Protection
By eliminating the conditions that lead to wood rot and decay, encapsulation protects your home’s structural integrity. This prevents costly repairs to floor joists, subflooring, and other critical components of your home.
Energy Efficiency
A properly encapsulated crawl space improves your home’s energy efficiency by reducing the workload on your HVAC system. This can lead to noticeable savings on your energy bills, particularly in humid climates.
Pest Prevention
The vapor barrier and sealed environment created through professional encapsulation helps deter pests that are attracted to damp environments. This includes termites, rodents, and other unwanted visitors that can damage your home.
Increased Home Value
A properly encapsulated crawl space is an attractive selling point for potential buyers. It demonstrates that you’ve taken steps to protect the home from moisture issues and provides peace of mind about structural integrity.
Long-Term Protection
Professional encapsulation systems are designed to last for decades when properly installed. This provides long-term protection against moisture and mold issues, making it a worthwhile investment in your home’s future.
Have questions about crawl space encapsulation?
DIY vs. Professional Crawl Space Mold Encapsulation

Many homeowners consider DIY encapsulation to save money, but it’s important to understand the differences between DIY and professional approaches:
| Consideration | DIY Approach | Professional Service |
| Initial Cost | Lower upfront investment ($1,500-$3,000) | Higher initial cost ($5,000-$15,000) |
| Mold Assessment | Limited visual inspection | Comprehensive assessment with moisture testing |
| Material Quality | Consumer-grade materials | Commercial-grade, specialized materials |
| Installation Quality | Varies based on skill level | Consistent, proven techniques |
| Time Investment | Significant (40+ hours for average space) | Minimal (completed in 1-3 days) |
| Problem Identification | May miss underlying issues | Comprehensive problem detection |
| Warranty | None or limited material warranty | Typically 10-25 year system warranty |
| Long-term Results | Variable effectiveness | Consistent, proven performance |
When DIY Makes Sense: For small, dry crawl spaces with no existing mold or moisture issues, a DIY approach may be sufficient if you have construction experience and the proper tools.
When Professional Service Is Recommended: If you have active mold growth, standing water, structural concerns, or a large crawl space, professional installation will provide superior results and peace of mind.
Frequently Asked Questions About Crawl Space Mold Encapsulation
Is crawl space encapsulation worth it for mold prevention?
Yes, crawl space encapsulation is one of the most effective long-term solutions for preventing mold growth. By creating a moisture barrier and controlling humidity levels, encapsulation eliminates the conditions mold needs to grow. The investment typically pays for itself through improved energy efficiency, prevented structural damage, and better indoor air quality. Most homeowners report that the benefits far outweigh the initial cost, especially when considering the health implications of untreated mold.
How long does crawl space mold encapsulation last?
A professionally installed crawl space encapsulation system typically lasts 15-20 years or longer. The longevity depends on several factors including material quality, installation expertise, and ongoing maintenance. High-quality vapor barriers (10-20 mil thickness) resist tears and degradation better than thinner materials. Professional installations often come with warranties ranging from 10-25 years, providing long-term protection and peace of mind.
What is the average cost of professional crawl space mold encapsulation?
The cost of professional crawl space encapsulation typically ranges from ,000 to ,000 depending on several factors. These include the size of your crawl space, the extent of existing mold or moisture issues, your geographic location, and the specific materials and systems installed. While this represents a significant investment, many homeowners find that the long-term benefits—including energy savings, prevented structural damage, and improved health—make it worthwhile. Some companies also offer financing options to make the investment more manageable.
Can I encapsulate my crawl space if it already has mold?
No, you should never encapsulate a crawl space with existing mold. The mold must be properly remediated first. Encapsulating over active mold growth would trap the mold and potentially worsen the problem by creating a sealed environment where the existing mold continues to damage wood structures. Professional mold remediation should be completed before encapsulation begins. This typically involves removing contaminated materials, treating surfaces with appropriate antimicrobial solutions, and ensuring the space is completely dry before installing the vapor barrier system.
Do I need a dehumidifier after crawl space encapsulation?
In most cases, yes. While encapsulation significantly reduces moisture intrusion, a dedicated crawl space dehumidifier provides an additional layer of protection by maintaining optimal humidity levels (below 55%). This is particularly important in humid climates or if your home has other moisture sources that could affect the crawl space. A properly sized dehumidifier with a drain line ensures consistent humidity control without requiring frequent maintenance. Many professionals consider a dehumidifier an essential component of a complete crawl space encapsulation system.

Protect Your Home with Professional Crawl Space Mold Encapsulation

Crawl space mold encapsulation is a significant but worthwhile investment in your home’s health, structural integrity, and energy efficiency. By creating a complete moisture barrier and controlling humidity levels, proper encapsulation eliminates the conditions that allow mold to thrive, protecting both your property and your family’s health.
While DIY approaches may seem cost-effective initially, the complexity of proper encapsulation and the potential consequences of mistakes make professional installation the recommended choice for most homeowners. Experts bring specialized knowledge, materials, and techniques that ensure long-lasting results and peace of mind.
Remember that encapsulation is not just about installing a vapor barrier—it’s a comprehensive system that includes proper preparation, high-quality materials, moisture control equipment, and ongoing monitoring. When done correctly, it transforms your crawl space from a potential problem area into a clean, dry asset that contributes to your home’s overall performance.
Ready to Solve Your Crawl Space Mold Problems?
Our certified technicians provide comprehensive crawl space mold encapsulation services tailored to your home’s specific needs.