28% of American homes have undetected moisture issues that create ideal breeding grounds for dark-colored fungi. These stubborn growths thrive in humid spaces like basements and bathrooms, often spreading unnoticed behind walls or under floors. Left unchecked, they can compromise both property integrity and indoor air quality.
Stachybotrys chartarum – the scientific name for a common household intruder – feeds on cellulose-rich materials like drywall and wood. Unlike surface-level cleaning solutions, certified specialists use infrared scanners and moisture meters to locate hidden colonies. Their containment protocols prevent spore dispersal during removal, addressing the root cause rather than just visible symptoms.
Many homeowners discover these issues only after musty odors or allergy-like symptoms appear. Timely intervention by trained professionals helps prevent minor concerns from escalating into major structural repairs. Their detailed assessments create customized treatment plans that prioritize safety and long-term prevention.
Key Takeaways
- Specialized detection tools reveal hidden growth in building materials
- Proper containment prevents spore spread during removal
- Custom treatment plans address specific contamination levels
- Certified teams follow strict safety guidelines
- Early action reduces repair costs and exposure concerns
- Complete removal requires addressing moisture sources
Introduction to Black Mold and Associated Health Risks
Unseen water damage in houses can result in dangerous fungal colonies affecting indoor air. These organisms release microscopic particles that float through ventilation systems, potentially causing reactions ranging from sneezing fits to chronic respiratory discomfort. Sensitive individuals might experience worsened allergy signs within hours of exposure.
Overview of Mold and Its Health Impacts
Fungal growths produce two primary irritants: airborne particles and chemical odors. Those with existing sensitivities often report watery eyes, nasal congestion, or skin rashes. However, even unaffected individuals may notice throat irritation or headaches in contaminated spaces.
| Symptom Type | Allergic Reaction | Non-Allergic Response |
|---|---|---|
| Respiratory | Wheezing, asthma attacks | Coughing, sore throat |
| Skin | Rashes, itching | Dryness, redness |
| Sensory | Severe sneezing | Headaches, fatigue |
Why Safe Remediation Matters
Improper handling of fungal colonies can spread particles throughout a home. Certified teams use sealed containment zones and HEPA filtration to prevent cross-contamination. Their methods ensure complete removal while protecting occupants from further exposure.
Key fact: 54% of DIY cleanup attempts fail to eliminate odor-causing compounds, according to indoor air quality studies. Professional-grade treatments target both visible growth and hidden moisture sources.
Understanding Black Mold: What You Need to Know
Cellulose-rich surfaces in homes often become unexpected buffets for persistent biological growth. While many fungi varieties exist, one particular strain demands special attention due to its destructive habits and distinct features.

Defining Characteristics of Problematic Fungi
Stachybotrys chartarum stands out among household fungi with its slimy texture and dark greenish hue. Unlike powdery surface growths, this variety penetrates deep into porous substances. Paper-based products and wooden structures provide ideal nourishment due to their high cellulose content.
Common building components like drywall become prime targets. As mycologist Dr. Ellen Torres notes:
“Identification relies on both visual cues and material context – true infestations rarely appear on non-cellulose surfaces.”
| Fungi Type | Common Colors | Preferred Materials |
|---|---|---|
| Stachybotrys | Dark green/black | Wood, drywall, paper |
| Aspergillus | Yellow/green | Fabric, insulation |
| Cladosporium | Olive/brown | Tile grout, paint |
Three key identifiers help distinguish problematic growth:
- Oily or gelatinous texture
- Concentric circular patterns
- Musty, earthy odor
Early recognition prevents structural damage. Regular inspections of moisture-prone areas help catch issues before they compromise building integrity.
Identifying the Unseen Dangers of Moisture and Water Leaks
Damp spots in your home might seem harmless, but they’re silent invitations for unwanted biological growth. These hidden threats often begin with small plumbing issues or condensation buildup, creating ideal conditions for rapid colonization.

How Water Damage Fuels Biological Expansion
Persistent dampness acts like a growth accelerator. Leaky pipes or roof cracks provide continuous moisture – the key ingredient needed for colonies to thrive. Warm, enclosed spaces near windows or under sinks become prime targets.
| Water Source | Detection Difficulty | Average Spread Time |
|---|---|---|
| Pipe leaks | High (hidden in walls) | 48-72 hours |
| Window condensation | Moderate | 1-2 weeks |
| Foundation seepage | Very High | 3-6 months |
Three critical factors combine to create perfect growth conditions:
- Sustained humidity above 60%
- Organic materials like drywall or wood
- Poor air circulation
Basements and bathrooms account for 67% of household cases according to building science research. Minor leaks left unaddressed for 48 hours can initiate colonization. Regular checks around appliances and ventilation systems help catch issues early.
“Moisture meters detect problems invisible to the eye – that faint musty smell often means it’s already established.”
black mold health risk remediation experts
Hidden biological growth often requires more than surface-level inspection. Certified teams use thermal imaging and air sampling to map contamination patterns invisible to homeowners. Their findings determine whether materials can be salvaged or need replacement.

Expert Advice on Assessing Infestations
Thorough evaluations start with moisture mapping. Qualified professionals check wall cavities, ductwork, and subflooring using borescopes and particle counters. These tools reveal colonies growing on insulation or wooden beams – areas most DIY kits miss.
Advanced lab analysis identifies spore types and concentration levels. As one industry leader explains:
“Proper assessment dictates treatment success – guessing at contamination spread risks incomplete removal.”
Selecting the Right Service Provider
Verify credentials before hiring any service. Reputable providers carry IICRC certification and general liability insurance. They follow EPA guidelines for containment and disposal.
Ask about post-treatment verification processes. Many companies use third-party testing to confirm elimination. This ensures your living spaces meet safe air quality standards.
Ongoing maintenance plans help prevent recurrence. These might include humidity monitoring or ventilation upgrades. Trusted specialists coordinate with contractors to address moisture sources permanently.
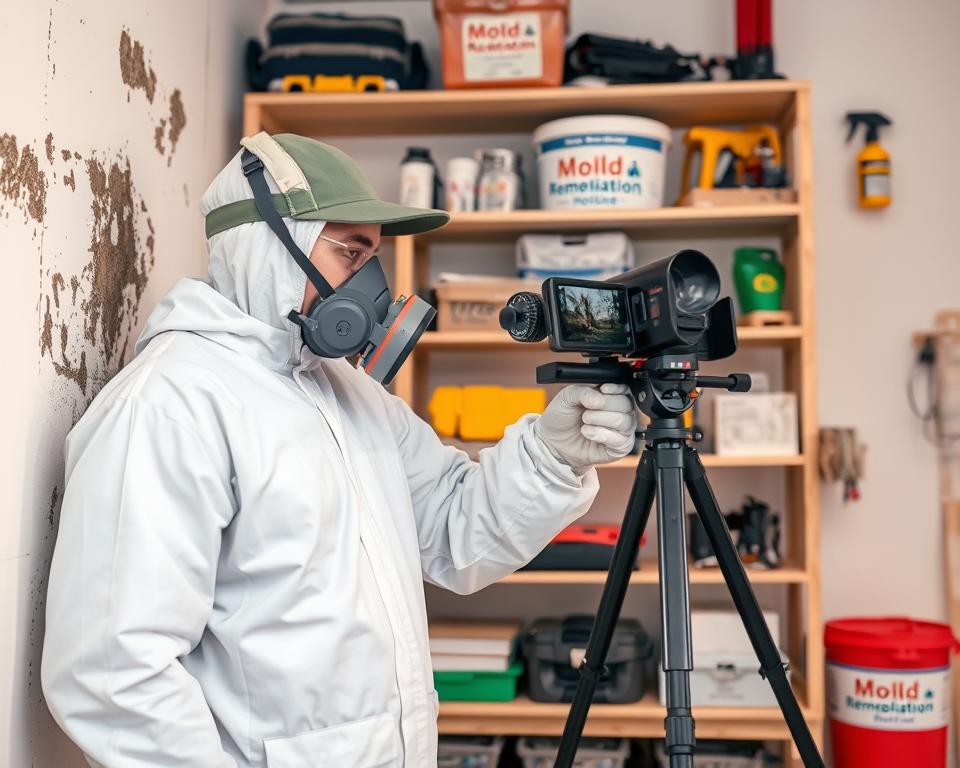
Essential Tools and Safety Gear for Mold Remediation
Proper equipment transforms hazardous cleanup into controlled operations. Specialized gear creates barriers between workers and contaminants while advanced tools limit particle spread. This approach protects both technicians and home occupants during intensive removal processes.

Personal Protective Equipment Guidelines
Respiratory masks with HEPA filters block 99.97% of airborne particles. These prevent microscopic spores from entering the lungs during scrubbing or demolition work. Tight-sealing goggles shield the eyes from floating debris and cleaning solutions.
Disposable coveralls with hoods eliminate skin contact during colony removal. Thick nitrile gloves resist tears from sharp edges or chemical exposure. After use, all protective layers get bagged and discarded to avoid cross-contamination.
Negative air machines maintain cleaner air by pulling particles through filtration systems. Workers seal off affected areas with plastic sheeting before starting projects. Post-job protocols require showering and changing clothes immediately after leaving containment zones.
One industrial hygienist notes: “Safety isn’t just about gear – it’s creating multiple layers of defense against exposure risks.” Regular equipment checks ensure seals remain intact and filters function properly throughout multi-day projects.
Step-by-Step Guide to Removing Mold Safely
Proper containment and cleaning methods make the difference between temporary fixes and lasting solutions. Before tackling visible growth, strategic planning prevents accidental spore spread and protects unaffected zones.
Preparation and Initial Assessment
Begin by sealing the contaminated space with plastic sheeting. Use zippered entry flaps and negative air machines to create isolation barriers. Protective gear like N-95 respirators and disposable coveralls become essential during this phase.
Professionals recommend dividing the space into three zones:
| Zone Type | Purpose | Equipment Needed |
|---|---|---|
| Containment | Active work area | HEPA scrubbers, plastic sheeting |
| Decontamination | Gear removal | Disposal bins, antiseptic wipes |
| Clean Area | Tool storage | Sealed containers |
A certified inspector from EcoClean Solutions advises: “Always test materials before cleaning – some surfaces trap particles even after treatment.” This evaluation determines which items require disposal versus specialized cleaning.
Effective Clean-Up Techniques
Non-porous materials like glass or metal respond well to antimicrobial sprays. Apply solutions according to manufacturer directions, scrubbing with stiff brushes. Allow treated surfaces to dry completely before reassessment.
For porous substances like drywall or carpet, complete removal often becomes necessary. Bag contaminated materials in heavy-duty plastic before transporting through decontamination chambers. Always clean from least to most affected areas to limit cross-contamination.
| Material Type | Cleaning Method | Success Rate |
|---|---|---|
| Tile/Glass | Scrubbing + Disinfectant | 98% |
| Wood | Sanding + Encapsulation | 85% |
| Drywall | Full Replacement | 100% |
Final air quality tests confirm successful removal. These measurements should show spore counts matching outdoor levels before reopening treated spaces.
Controlling Humidity and Preventing Recurrence in Your Home
Indoor climates often hide invisible threats that flourish when moisture lingers. Managing your home’s environment requires smart strategies to balance air quality and humidity levels. Simple adjustments paired with modern technology create defenses against persistent issues.

Smart Climate Management Techniques
Keep indoor humidity below 60% using dehumidifiers in damp areas like basements. These devices work like moisture magnets, pulling excess water from the air. Pair them with exhaust fans in bathrooms and kitchens where steam accumulates.
Three critical steps improve air circulation:
- Open windows during low-humidity days
- Install ceiling fans to disrupt stagnant air
- Maintain HVAC systems with regular filter changes
Advanced sensors now track conditions 24/7, sending alerts when levels rise. One building scientist notes: “Prevention starts with awareness – hidden moisture pockets often cause the worst problems.” Combine technology with daily habits like wiping shower walls or fixing leaks promptly.
| Tool | Purpose | Ideal Location |
|---|---|---|
| Dehumidifier | Moisture removal | Basements |
| Hygrometer | Humidity tracking | Living areas |
| Ventilation fan | Air exchange | Bathrooms |
Long-term success comes from addressing both structural and behavioral factors. Seal cracks in foundations and upgrade insulation while encouraging household members to use ventilation systems properly. This dual approach creates lasting protection for your home’s environment.
Recognizing Health Symptoms Linked to Mold Exposure
Many homeowners mistake early warning signs for common colds or seasonal allergies. Exposure to fungal spores can trigger reactions that intensify with prolonged contact. Those with existing sensitivities often notice faster-onset effects, while others develop symptoms gradually.

Respiratory and Skin Irritations
Persistent coughing and wheezing often signal airborne particle irritation. Individuals with asthma or COPD may experience tightened chest muscles and reduced lung capacity. A 2022 Johns Hopkins study found 63% of asthma patients reported worsened breathing within 24 hours of exposure.
Skin contact with contaminated surfaces frequently causes redness and itching. Dermatologists report cases where rashes spread beyond initial contact areas due to immune responses. Protective clothing becomes essential during cleanup to prevent direct particle transfer.
| Symptom Type | Common Triggers | Average Onset Time |
|---|---|---|
| Respiratory | Spore inhalation | 2-48 hours |
| Skin | Surface contact | 15 minutes-6 hours |
| Sensory | Chemical odors | Immediate |
Dr. Alicia Mendez, an allergist, emphasizes: “Early symptom recognition prevents chronic issues. If nasal congestion or throat irritation persists beyond typical allergy seasons, consider environmental testing.” Those with family histories of sensitivities should prioritize air quality checks.
Timely medical consultation helps distinguish between temporary reactions and contamination-linked conditions. Blood tests and skin prick exams provide definitive answers when uncertainty exists.
Monitoring Air Quality and Mold Spore Levels
Indoor environments require vigilant monitoring to maintain safe breathing conditions. Advanced testing methods now detect microscopic threats long before visible signs appear. These systems track airborne particles and humidity fluctuations that encourage biological growth.

Professional assessments measure spore concentrations with precision equipment. Technicians compare indoor readings to outdoor baselines, identifying abnormal particle levels. This data guides targeted cleanup strategies rather than guesswork approaches.
Baseline measurements taken before treatment serve as critical reference points. Post-remediation tests must show at least 90% reduction in spore counts for successful clearance. Many firms use third-party labs to verify results, ensuring unbiased evaluations.
Modern sensors detect particles at concentrations as low as 1 per cubic meter. Early warnings allow homeowners to address moisture issues before colonies establish. One industrial hygienist notes: “Air sampling acts like a smoke detector for invisible contaminants – it buys time for preventive action.”
Regular checks create historical data to spot emerging patterns. Monthly or seasonal monitoring proves most effective in high-risk areas. Combined with humidity control, this proactive approach maintains healthier indoor spaces year-round.
Assessing the Impact of Mold on Various Home Materials
Building components react differently when faced with fungal challenges. The type of surface determines whether cleaning suffices or full replacement becomes necessary. Proper evaluation prevents unnecessary expenses while ensuring thorough contamination removal.
Material-Specific Response Patterns
Porous materials like drywall act as sponges for moisture and spores. Once infiltrated, complete removal remains the only reliable solution. Industry guidelines suggest replacing affected sections plus 12 inches beyond visible growth.
Wooden beams and framing require careful inspection. Surface-level cleaning works if decay hasn’t compromised structural integrity. Sanding combined with antimicrobial treatments salvages 70% of cases according to restoration reports.
| Material | Treatment | Success Rate |
|---|---|---|
| Drywall | Full replacement | 100% |
| Wood | Sanding + sealing | 85% |
| Metal/Glass | Disinfection | 98% |
Non-porous surfaces like tile respond well to scrubbing with EPA-approved solutions. Composite boards and engineered wood often harbor hidden colonies, demanding complete removal. Wall cavities need borescope inspections to check insulation and studs.
As one contractor notes: “You can’t judge by what’s visible – the real damage usually hides behind the surface.” Professional assessments map contamination spread, guiding appropriate responses for each material type.
Professional Remediation Versus DIY: What You Should Consider
Homeowners often face tough choices when addressing biological growth issues. While small surface-level problems might seem manageable, improper handling can lead to recurring issues. Understanding project scope and potential risks helps determine the best approach.
Weighing the Costs and Benefits
DIY methods may appear cost-effective initially. Store-bought cleaners work for minor spots on non-porous surfaces. However, hidden moisture sources often remain undetected without thermal imaging tools. Many homeowners spend more on repeated treatments than a single professional service would cost.
Certified teams bring industrial-grade equipment and structural knowledge. Their containment protocols prevent cross-contamination during removal. For severe cases affecting walls or insulation, professional intervention becomes essential to preserve building integrity.
Consider these factors before deciding:
- Project size and contamination depth
- Equipment accessibility and costs
- Potential health impacts during cleanup
Time investment matters too. What takes a weekend warrior 15 hours might require 3 hours for trained technicians. Prioritize safety and lasting results when dealing with persistent issues or sensitive occupants.